Quick Start for Account Admins (Brandkit 1)
Congratulations on selecting Brandkit to manage your brand and visual assets, a powerful yet elegant digital asset management solution.
Now let’s get you started.
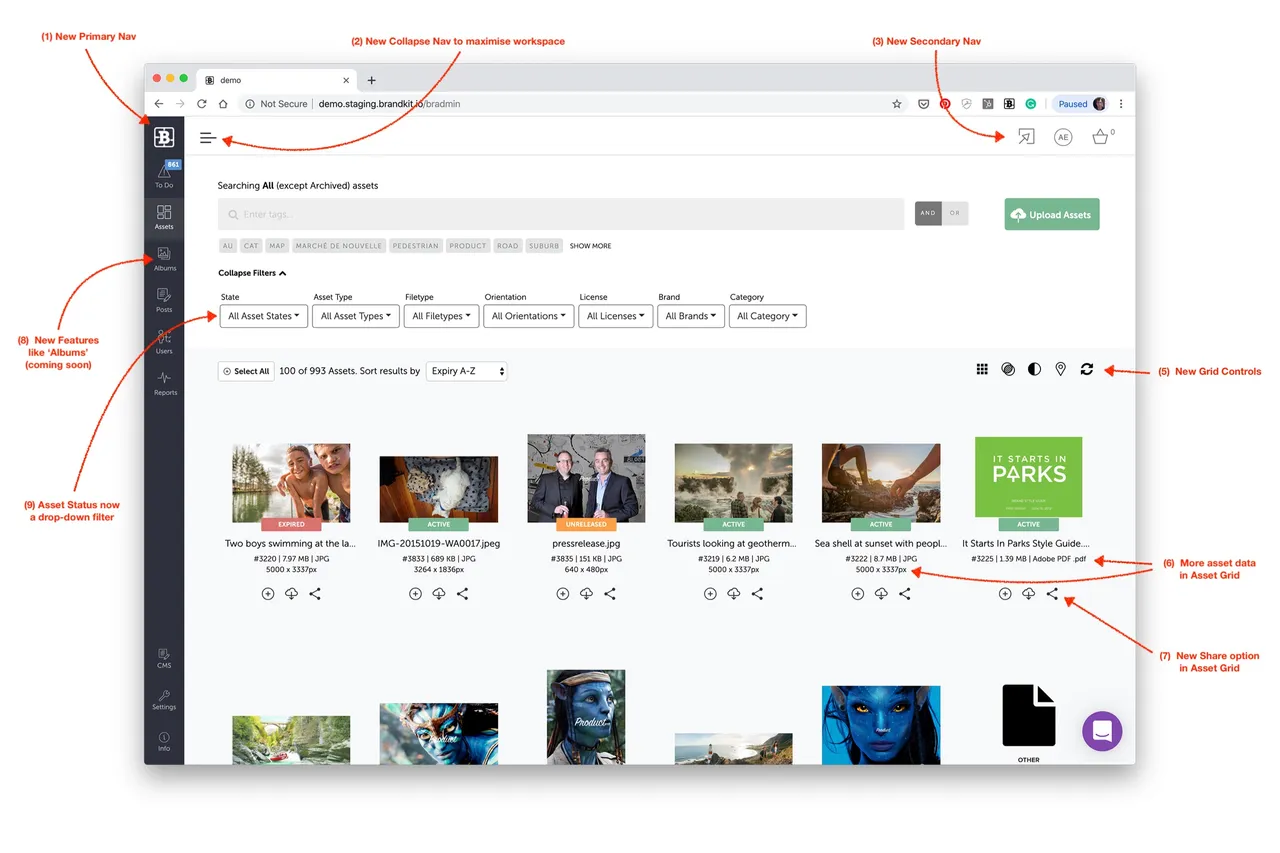
When you login as an Admin user, the Admin interface is your default view. You can switch back and forth between the Admin interface (to manage assets, users and see reports) and the Portal interface (to see what non-Admin users see).
You should now be logged in as an Admin user AND have navigated to the Admin interface (shown above).
If you find yourself still in the Portal interface - click the Cog icon (usually with Admin text underneath) in the top right menu.
Now that you have familiarized yourself with the overall view and how we name things, the best way to learn is to roll your sleeves up and get started.
Brandkit was born to help you manage and share your marketing files, what we refer to as Assets. So the first thing we need to do is to get some of those Assets into your Brandkit, by uploading them. Let’s go!
Step 1 Upload some content
1. Click the Upload Assets button.2. Decide what to upload- Drag some files into the upload window, or
- Click Select from My Computer, or
- Click an online Storage Service (e.g. Dropbox), authenticate the app then select a files or whole folders (if using the Chrome browser), then Upload
Pro Tip: It’s often much faster uploading big files that have been previously synced to services like Dropbox, Google Drive, etc because uploads from these online services are high speed data-center to data-center transfers.
- Once you’ve selected the files you wish to upload, click Upload.
The Files will be Uploaded and a progress bar will show progress. Once complete the files are converted to Assets with asset id’s and some automatically generated meta data. All new Assets are automatically set to an Unapproved state and you will find your new Assets in the All Assets view or the Unapproved View. You may need to reload the Asset Grid or Refresh the Browser Window to see your new assets.<strong><em>Note</em></strong><em>: Asset thumbnail images are processed automatically and can take some time depending on number of file, size of files and file type. In some cases you may have to allow a few minutes for the thumbnails to appear.</em>
Step 2 Edit Metadata, Add Tags
Once the Assets are created, you can (and should) click on each one (Asset) and edit the Asset’s Vault, Metadata and Tags.
You can also batch edit several assets at once via the Basket. Typically we use batch editing to classify and edit Assets.
Tip: Some Fields in the Edit form will feature drop-downs. e.g. Vault, Licence, Location, Credit, etc. These drop-downs are populated by preset configurations - you may need to edit your Settings or contact Brandkit support to set these up for your account.
Repeat for each Asset.
Step 3 Approve
Once you’ve uploaded, edited and tagged your Asset and you’re happy for it to be accessed by users, you should Approve it. This will publish it to the Portal.
Note: All new Assets are set to Draft status by default - you must Approve an Asset before it will appear in the Portal.
- To approve one Asset at a time: click the Status lozenge on the Asset’s page and select Approve. Repeat for each Asset you wish to approve.
- To Approve multiple Assets at a time: select all the Assets you want to Approve so that they are in the Basket. In the Basket click the Edit button and select Approve.
Provided the Asset has reached it’s Release date and is not Expired it will now appear in the Active status view, and be visible in the Portal.
Step 4 Review
Now go to your Portal, search for the Asset (if you tagged it well this should be easy peasy). Click on it to view a Preview, click through to more details and check the detail page shown in the Portal, try downloading or selecting it.
Need to change something? Just click the Manage button - this will jump you back to the Admin interface where you can Edit the Vault, Metadata, Tags, etc
Step 5 Invite some users
Assuming you’re happy with the Assets you have uploaded and approved - AND you’re now ready to start sharing your Assets via Brandkit - it’s time to invite some Users.
There are two ways to get Users into your account.
-
Just send them to your site’s URL and provided you have allowed user to self-register, they can register and then login. You don;t need to approve these user but you should ensure that your default user role has appropriate access rights. Discuss options with your Brandkit contact.
-
Explicitly invite new users. You can invite specific people to login by inviting them. You just need an email address and select an appropriate User Role.
-
Click Users in the main nav.
-
Click Invitations
-
Click the + New Invitation button
-
Enter an email address for the user and select a User Role.
-
Click Send Invitation button
The user will receive an Invitation by email. Once they click the Accept Invitation link in the email they can complete registration and will be assigned the Role you selected.
Any questions - please contact BrandKIt support - we’ll be happy to help :)
Quick Start for Account Admins (Brandkit 1)
A quick setup guide for new account Admins.