How to create a complete brand kit for your brand (a Step-by-Step Guide)

(Photo by Worshae)
If you’re building a brand that needs to be seen, shared, and remembered consistently across channels, teams, and campaigns, you need more than just a logo and a moodboard.
You need a brand kit.
But not the watered-down version that some platforms peddle. We’re talking about a comprehensive, living system that houses every asset, every guideline, every tool your team needs to bring your brand to life — every day.
This guide walks you through exactly how to build one, from strategy to storage.
What is a brand kit?
A brand kit is a centralized collection of all the visual, verbal, and strategic elements that define your brand — plus the assets and tools to use them.
It includes:
- Brand guidelines (logos, colors, fonts, voice)
- Marketing assets (photos, video, sounds, graphics, copy, templates)
- Brand story, narrative and positioning
- Systems for access, sharing, and governance
Think of it as your brand’s operating system (or Branding System).
Why you need one
- Consistency across every touchpoint and team
- Speed in asset creation, sharing, and approval
- Clarity for internal teams and external partners
- Control over brand usage and asset rights
Let’s build yours.
Step-by-Step: How to build your brand kit
Step 1: Define your brand strategy
Before you dive into visuals, get clear on what your brand stands for.
Deliverables to include:
- Mission Statement — Why you exist
- Vision Statement — Where you’re going
- Brand Values — What you stand for
- Audience Personas — Who you’re talking to
- Positioning Statement — What makes you different
- Brand Personality — If your brand were a person, who would it be?
📌 Tip: Keep these in a “Brand Strategy” section within your brand kit for easy reference by leadership, partners, and agencies.
Step 2: Create Brand Guidelines
This is what most people think of as a “brand kit” — but it’s just one part of it.
Elements to include:
1. Logos
Display all your approved logo artwork as images and link to downloadable artwork files or images.
- Primary logo, Secondary/alternate logos - show images of all your approved logo variants and colourways. Also add links to downloadable Logo artwork files, usually secured by a login and appropriate user permissions. For example Brandkit provides this feature automatically. Each logo should be named with a unique name (e.g. Primary Horizontal Logo Lockup
- Icons or Favicons - show images of any custom designed icons or favicons, etc with secure links to download (as above).
- Clear space rules - typically logos should have a clear space (also referred to as “isolation area”) or margin around the logo, so that other elements close to the logo don’t distract or detract from it.
- Minimum size - some logo artwork or Logotext becomes illegible at small sizes, on screen, and in print. So it’s common to specifiy minimum sizes in pixels and in mms or inches for print. You can also develop special simplified logo art for small sizes if for example you need a small logo for applying to small products or spaces. It’s common for brands to create a simplified icon for use as a website Favicon (that small logo that appears in your web browsers tab) because the display space can be limited to as small as 16x16 pixels.
2. Color Palette
Display all your approved brand colours, often in a grid of colour swatches. But you can get creative here with how you display your colours, just make sure it’s easy to find and copy the exact colour specs (e.g HEX color code for web). So legibility is paramount.

- Your Primary and secondary colors - typically these will be the colours in your logos.
- Any additional colours - used commonly and repeatedly across your brand identity, website and marketing materials.
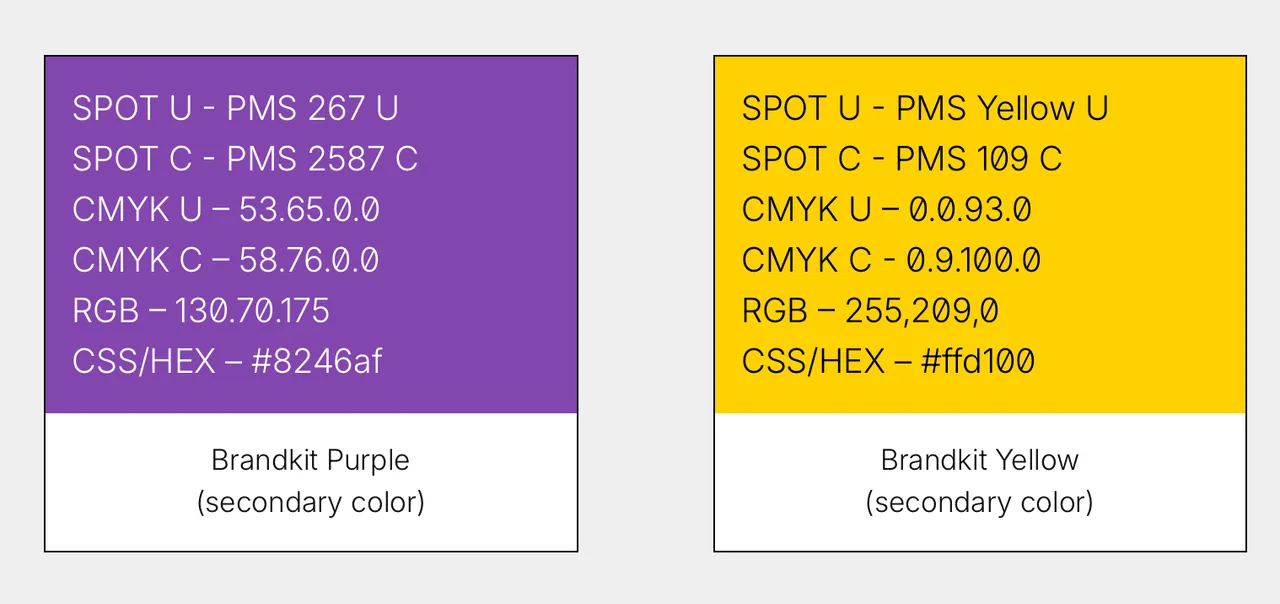
- Specify the proper colour codes across screen, print and signage or product branding. This should include HEX for web (e.g. #8246af), RGB for web/screen (e.g. 130.70.175), CMYK for print (e.g. 53.65.0.0) and Spot for print, signage, physical products (usually Pantone PMS specified code - e.g. SPOT U - PMS 267 U) colour codes.
- Colour is a complex area and it’s easy to make mistakes - we recommend consulting a professional graphic designer for advice.
- Accessibility contrast guidance (optional)
3. Typography
- Fonts for headings, subheadings, and body text
- Web-safe alternatives
- Use case examples
4. Iconography
- Brand icon style
- Approved icon sets or libraries
- Usage guidelines
5. Design Examples
- Social media post examples
- Ads and banners
- Product packaging or UI screenshots
📌 Deliver these in a brand guidelines PDF, AND upload visual references into your Brand Kit platform.
📷 Step 3: Curate brand imagery & photography
Visual storytelling is just as powerful as logos — and often overlooked.
Include:
- Hero images (high-impact brand visuals)
- Product photography
- Team or lifestyle imagery
- Backgrounds and textures
- Photo guidelines: composition, subject matter, filters
📌 Create collections for different uses: campaigns, web, press, events.
🎥 Step 4: Upload video assets
Video is core to modern branding.
Assets to include:
- Brand reels or promo videos
- Product demos
- Social video clips
- Logo stingers and animations
- Interview B-roll or founder footage
Also document:
- Licensing rights
- Raw formats (for editors)
- Compressed formats (for web)
📌 Store these with preview thumbnails, and tag them for searchability (e.g. “explainer,” “testimonials”).
Step 5: Add Messaging & Brand Voice Guidelines
Words matter. Your voice builds trust, tone builds personality.
Include:
- Tone of voice (with examples)
- Boilerplate brand descriptions (short and long versions)
- Mission/vision statements
- Taglines and slogans
- Sample copy for ads, social, and emails
- Common phrases to use (or avoid)
📌 Also include editable text files or Google Docs of approved brand copy blocks.
Step 6: Provide Templates & Collateral
Make it easy for your team to execute on-brand content — fast.
Templates to include:
- Social post templates
- PowerPoint / Keynote decks
- Business card templates
- Email signatures
- One-pagers and datasheets
- Event or signage templates
📌 Use tools like Adobe Creative Cloud (Illustrator, etc) Figma, Canva, or Adobe Express — but store the final, editable files in your Brand Kit system.
Step 7: Set Up your Brand Kit platform
Your Brand Kit is only useful if people can find and use it.
Look for a platform that offers:
- Cloud-based, centralized access
- User roles and permissions
- Download controls (e.g. watermarking, expiry)
- Search and tagging
- Integration with design tools or CMS
- Analytics and reporting
📌 Tools like Brandkit a brand toolkit platform offers customisable self-serve digital brand toolkits tailored to brand-led teams.
Step 8: Train & Distribute
Once your Brand Kit is built, make sure it’s used.
- Host internal walkthroughs
- Share it with agencies, freelancers, and partners
- Add links to onboarding materials
- Embed in internal wikis or Slack
- Create usage videos or mini-trainings
📌 Think of this as an enablement campaign — not just an upload task.
Step 9: Maintain & Evolve
Brands are living. So are brand kits.
Schedule regular reviews:
- Quarterly updates to assets or guidelines
- New product launches
- Seasonal campaigns
- Legal or compliance changes
- Rebranding or brand refreshes
📌 Designate a brand owner or admin team responsible for maintaining your brand kit.
Final Thoughts
A brand isn’t built once — it’s built every day. And your Brand Kit is the infrastructure that makes consistent brand building possible.
Don’t settle for static PDFs or lost folders. Build a complete, organized, accessible Brand Kit that empower every person and project that represents your brand.
Get Brandkit
Ready to create your Brand Kit?
You’ll likely need a digital brand kit platform.
Try Brandkit.com - the leading Brand Toolkit Platform.
How to create a complete brand kit for your brand (a Step-by-Step Guide)
Learn how to create a complete Brand Kit—logos, imagery, video, copy, templates & more. Step-by-step guide to building a scalable brand system.


