Why use WebP images for the Web, and How to generate them?
The speed and performance of a website are critical factors that can make or break user experience and engagement.
One of the easiest ways to improve both is by optimizing the images you use, and WebP is increasingly becoming the go-to format for this purpose.
Here’s why you should use WebP images on your website and how you can generate them.
Why us WebP instead of JPG or PNG?
Developed by Google, WebP is a modern image format that provides superior compression while maintaining high quality. Here are the key advantages:
- Faster Load Times: WebP images are smaller in file size, reducing the bandwidth required to load a page. This means faster loading times, especially on mobile devices.
- High-Quality Compression: WebP supports both lossy and lossless compression, offering better quality at smaller file sizes than formats like JPEG and PNG.
- Transparency and Animation: It supports transparency (like PNGs) and animations (like GIFs), making it versatile for various web design needs.
- Browser Compatibility: As of 2024, WebP is supported by all major web browsers, including Chrome, Firefox, Edge, and Safari.
- SEO: Since site speed and user experience are critical ranking factors, implementing WebP can give you a competitive edge. Learn more about the SEO benefits of using WebP images here.
- Smaller file size: than an equivelent JPG.
- Supports transparency: and smaller than an equivelent PNG.
How to Generate WebP Images
Many systems still don’t support WebP generation. So here are three popular options:
1. How to generate WebP with Adobe Photoshop
If you’re a designer or marketer familiar with Adobe Photoshop, here’s how to export images as WebP:

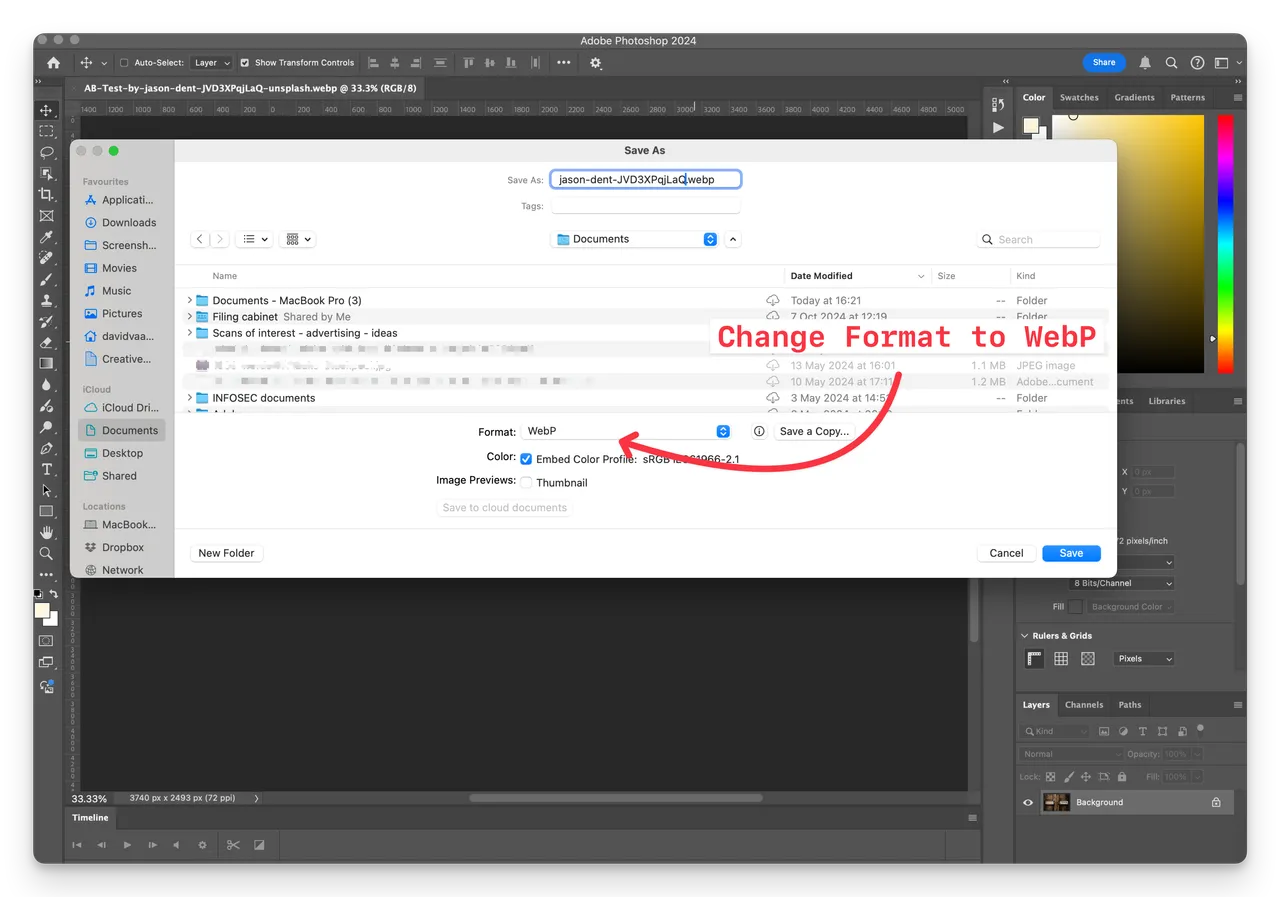
(Screenshot from Adobe Photoshop showing the Save As dialogue)
- Open Your Image: Open your image file in Photoshop as usual.
-
Save as WebP:
- Go to File > Save As
- In the dropdown menu, choose WebP as the format.
- Adjust the quality settings as needed to balance file size and visual quality.
- Save and Use: Save your image and upload it to your website.
In fact all thumbnails and previews on the Brandkit platform are generated automatically in WebP.
Note: Older versions of Photoshop will need to install a WebP Plugin. Newer versions of Photoshop (from 2021 onwards) support WebP natively, You can find the plugin from the Google Developers website.
2. How to generate using a Chrome Extension
Convert to WebP Using a Google Chrome Extension
To convert JPEG to WebP using a Chrome extension, you can use the “Convert WebP to JPG” Chrome extension.
Here’s a brief process:
1: Install the extension from the Chrome Web Store.
2: Click the extension icon to upload your JPG/JPEG or PNG files directly or by dragging and dropping them.
3: Select the folder and the image name to save your converted WebP image.
4: As a bonus - You can also convert any image in your browser to WebP without downloading it. Right-click on the image and select “Save image as WebP” to convert the image to WebP.
Note: Be aware that WebP images generated with this tool are not well optimized for size and there are no optimization settings available.
3. How to generate WebP with Brandkit
For teams managing a large number of assets and needing a robust digital asset management (DAM) system, Brandkit provides an excellent solution for managing images and to handle WebP conversions.

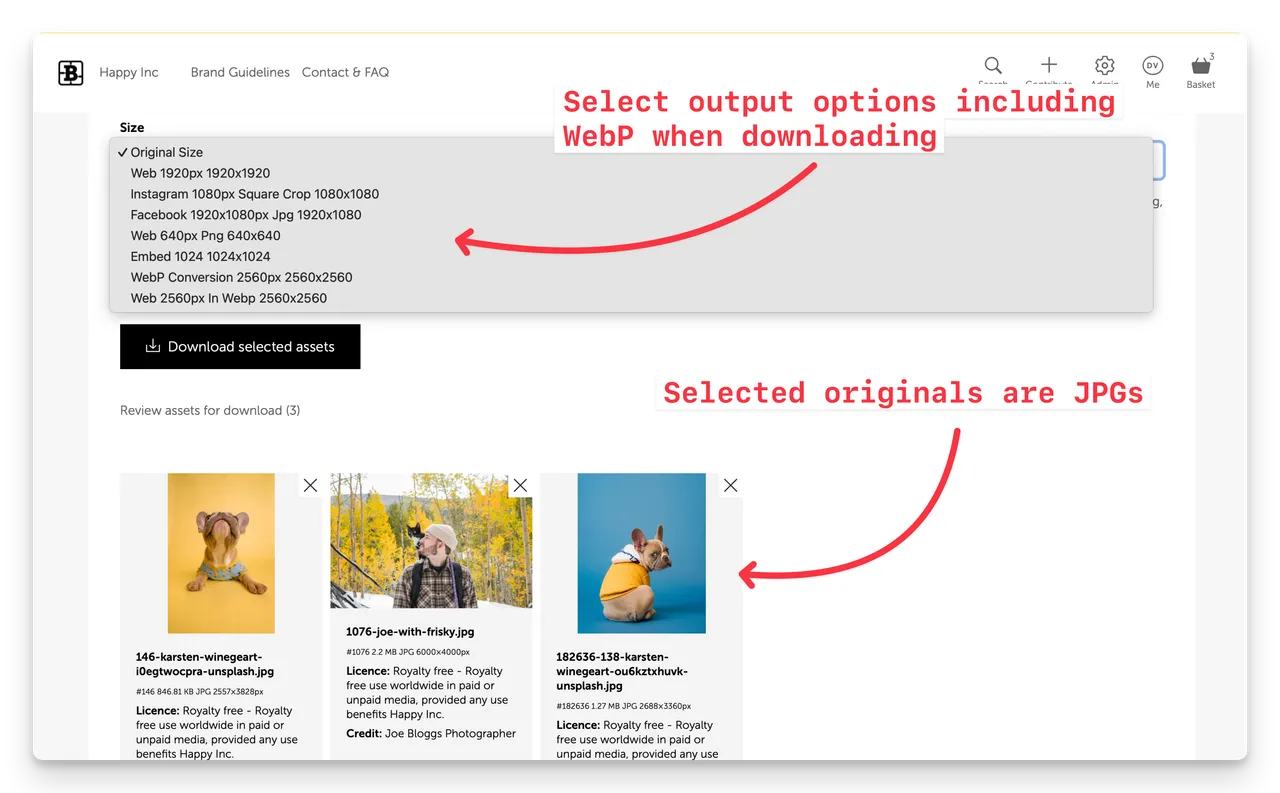
(Screenshot of a Download in Brandkit with WebP output options)
- Configure Conversion Settings - Setup your preferred conversion sizes and file formats in your account settings in the Conversions page. Select WebP as the file output. As a bonus you also have 4 cropping options to choose from.
- Upload to Brandkit: Once your image is uploaded to Brandkit, it automatically generates multiple formats, including WebP, for your assets (provided a WebP conversion is configured in your account settings)
- Access WebP Version: Simply navigate to the specific asset in Brandkit, and you’ll find the WebP version ready to download and use.
Note: While there are no optimization settings available, Brandkit does create smaller web optmized files in our testing.
By integrating WebP generation directly into your asset management workflow, Brandkit saves time and simplifies web performance optimization for your entire team.
Conclusion
Switching to WebP images can significantly improve your website’s speed and user experience without compromising on quality.
Whether you’re working with Adobe Photoshop, a Chrome Extension, or Brandkit, generating WebP images is straightforward and highly beneficial for your digital presence.
By adopting WebP, you ensure that your site is not only faster, and SEO friendly but also prepared for the future of web design, where performance is everything.
Brandkit is an advanced Brand and Digital Asset Management system for managing and sharing large collections of brand content like photography, video, logos, PDFs, stories and more. Learn more about Brandkit here.
Happy Branding :)


