Brandkit Feature: Conversions (Custom Download Sizes) now improved with cropping options
Brandkit's image conversion settings (aka custom download sizes) now comes with new cropping options. For example want a 1080px square image for Instagram. Easy. In the article we introduce the new options and how to use them.
Conversions (aka Custom Image Download Sizes)
When downloading an Image, Brandkit can provide download options for users at pre-configured sizes, provided the original image is large enough and you have Conversions configured ion your account settings.
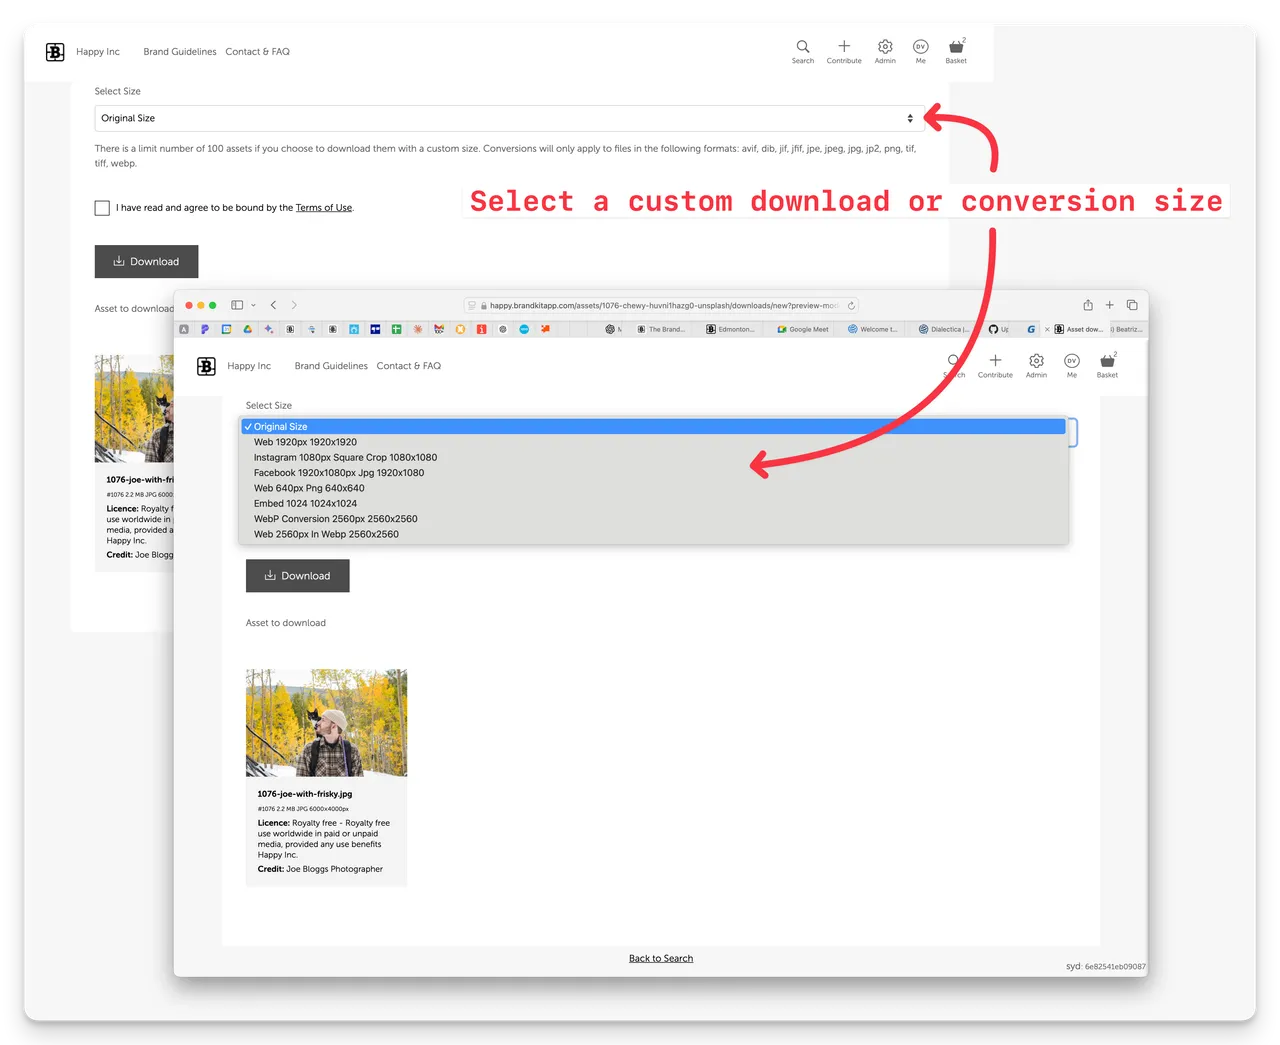 (Screenshot showing a Download page with Conversion options)
How to setup Conversions
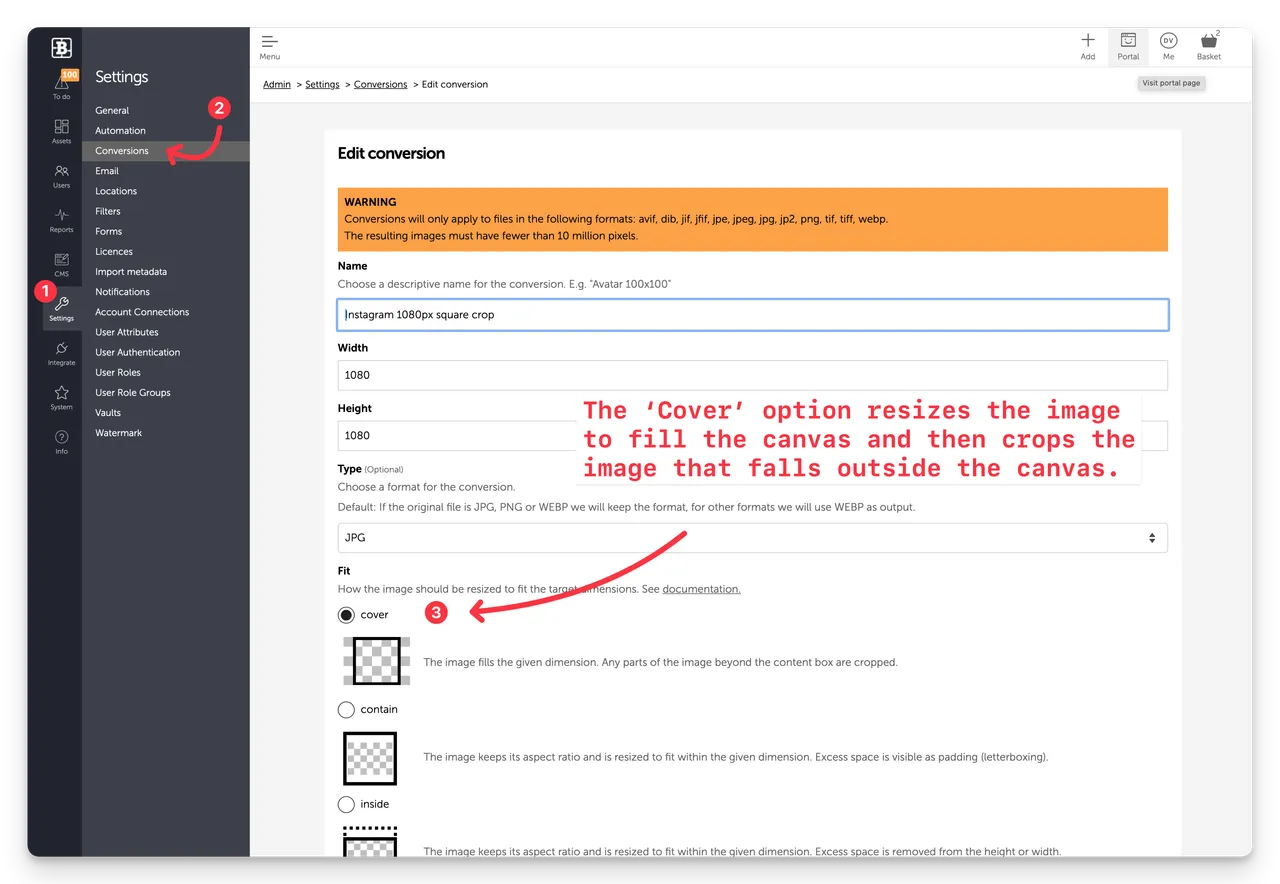
- In Admin navigate to Settings, then Conversions (Admin > Settings > Conversions).
- Add a new conversion by clicking the "+ New Conversion button"
- Choose a descriptive Name for the conversion. E.g. "Avatar 100x100"
- Specifiy a Height and Width in pixels(px)
- Select a Type - this will control what file format is produced The JPG/PNG/WEBP option will keep the original files file format where possible (must be a web compatible file format). An example of an exception is that a TIF file becomes a PNG file). The other options explicitly set the cnverted file format to JPG, PNG or WebP.
- Select a Fit option - this will control how the origional image is cropped to relative to your "canvas" determined by the Width and Height you set above.
- Test your Conversion by navigating to an Image Asset and downloading it.
- Come back to Conversion settings and edit to make any adjustments you need.
 (Screenshot of the Conversions Settings page in Brandkit Admin)
Note: Conversions will only apply to files in the following formats: avif, dib, jif, jfif, jpe, jpeg, jpg, jp2, png, tif, tiff, webp.
The resulting images must have fewer than 10 million pixels (e.g.3333px by 3000px, 3500px by 2857px, etc)
How Conversions work
Provided you have one or more Conversions configured in your account settings (Admin > Settings > Conversions), whenever a User is presented with a Download page, the Download Conversion option will be presented, where the User can elect to download either the original or one of the pre-configured conversions. This applies to single Asset downloads or batch Downloads.
We do not pre-generate all the Converted sizes you configure. Instead these converted maghes are generated on the fly, and on demand:
- The first time a user selects a conversion option, the Brandkit image processor will generate a resized image and store it in the CDN. This will take typically a few seconds and a loader will be shown.
- The second time a user selects the same conversion option, the image will be retrieved from the CDN and start downloading more or less immediately.
- This process will apply for each separate Conversion option you have, for each Asset.
Pro-Tip: Generate WebP images with Brandkit
The Google WebP file format (.webp) is a modern image format that is even smaller than JPG/JPEG and also supports transparency (which JPG/JPEG does not).
In addition Google says WEBP image aid SEO because the images are smaller and therefore web pages load faster and so Google prefers WebP - hence their investment in it.
You could also argue that WEBP images are more sustainable because being smaller they take less energy to store and move about.
That said even today in 2024 few tools support generating WebP images. Adobe has limited support for example.
You might be asking yourself:
So How do I create WebP images for my website?
Easy - you can use Brandkit Image Conversions to do this for you automatically.
Here's how:
- Add a conversion in your Conversion settings and select the output Type: WebP
- Upload your image (most image formats supported)
- Download the WebP option in your download options.
Easy Peasy.
Some Limitations
- The Fit options allow you to specify a fit strategy but there is no way to control focal point for the crop. It is always centered. We have to do it this way because Conversions are a "preset" that applies to all images. You cannot control the conversion asset by asset.
- There is a maximum of 10m pixels for the converted output. This means that you cannot have conversions that are larger than say 3500px by 2857px or 2587px x 3500px (because 9,999,599 pixels), etc.
- There is a max limit of 100 assets for batch downloads if you choose to download them with a custom size.
- Conversions will only apply to files in the following formats: avif, dib, jif, jfif, jpe, jpeg, jpg, jp2, png, tif, tiff, webp.
That's it - Enjoy.
Happy branding :)
Brandkit Feature: Conversions / Custom Download Sizes (now improved with cropping options)
Brandkit's image conversion settings (aka custom download sizes) now comes with new cropping options. For example want a 1080px square image for Instagram. Easy. In the article we introduce the new options and how to use them.