New embeddable and shareable Galleries feature in Brandkit

Your content should work as hard as you do.
That's why we've introduced a New Galleries feature in Brandkit.
You can now embed a Gallery in 3rd party websites and web pages, or share a Gallery with anyone via a shareable Magic-link.
See it in action. Check out this web page on our demo site —featuring 3 different layouts using the new embedded Galleries feature.
Or this shared Magic-link example.
What's New
We've added an entirely new Galleries feature that means Admins can now now create one or more Image Galleries in your Brandkit and deploy to 3rd party websites, Brandkit posts or CMS pages, and other web compatible places, with a an embeddable code block (with JS Script or iframe options), or share via magic-link.
Galleries are based on an explicit selection of Assets that can be updated by removing or adding Assets. This contrasts with Albums, which are based on a saved search query and update automatically as you add Assets that meet the search query's criteria.
This gives Admins control of exactly which Assets are included in a Gallery.
So what's new:
- New Galleries page in Admin > Assets > Galleries (lists all your current Galleries)
- New Save to Gallery workflow in the Save workflow in the Basket and for individual Assets
- Copy and paste generated embed code to 3rd party websites
- Copy and Paste embed code to Brandkit Posts or CMS Pages
- Share a Gallery as a stand alone Magic-link
- Update Galleries by Adding or Removing Assets
- Gallery items can include an info panel including Asset details like Licence Information
- Gallery items can include a link to the Asset page in your Brandkit Portal
- Gallery items can display a preview modal when clicked with information and links
- Gallery items can link directly to an Asset's CTA link (ideal for wiring up Gallery items to other web pages, ecommerce pages, bookings pages, etc).
- Galleries can include Images, Video, YouTube videos, Instagram Posts, and more.
- Galleries are always publically visible, meaning any Vault/Role permissions are ignored. This puts the onus on the Account Admins to select only suitable Assets.
- Gallery Assets cannot be downloaded, but user can link to the source Asset page to download the file (if they appropriate access permissions - i.e. normal permissions apply for download)
- Galleries display Asset Previews, not the original uploaded file.
- New Gallery settings page in the Settings menu under Admin > Settings > Galleries
No Additional Fees
There are no additional fees for the Galleries feature and it is available across all Editions and Plans for no additional cost.
However like all embeds there may be an impact of your Usage metrics (CDN traffic) when folks view your Galleries on 3rd-party websites, as those views are recorded in your metrics (see the section on Reporting below)
New Menu item
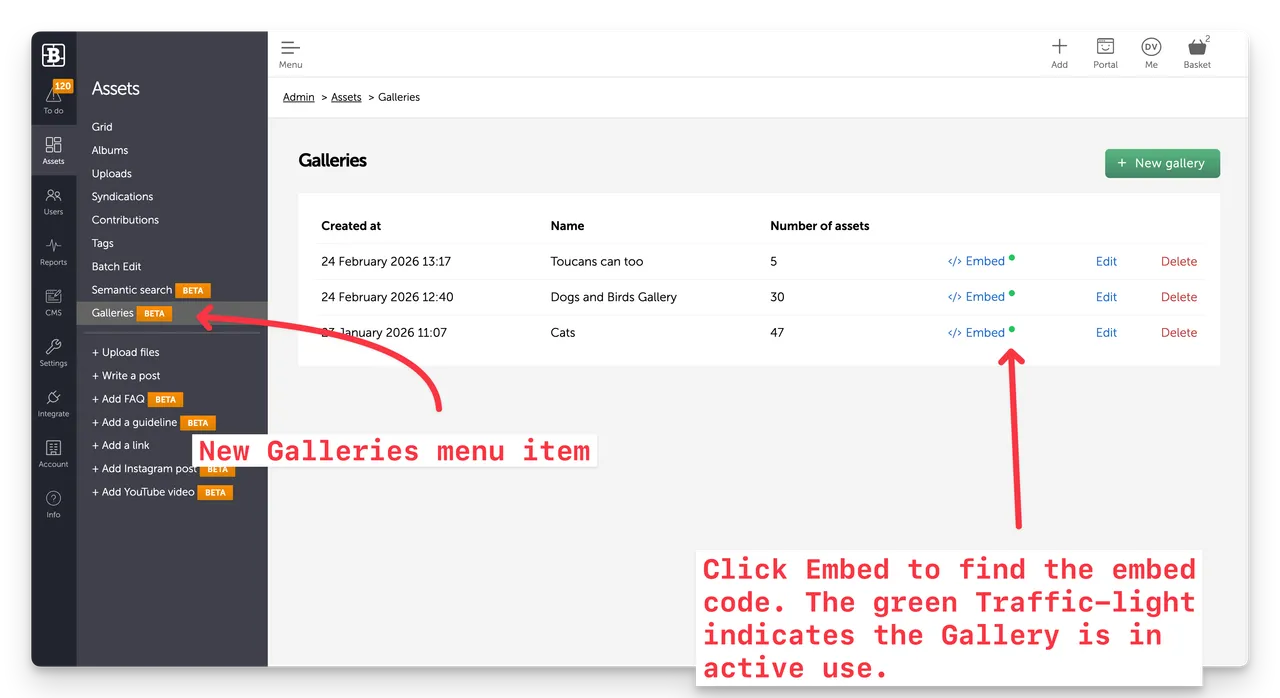
You'll find a new Galleries menu item in the Admin > Assets > sub menu.
Clicking this menu item open a Galleries listing page
There is also a new Settings menu item in the Admin > Settings > sub menu
Clicking this menu item opens the Galleries configuration options page, where you can setup your Gallery Layouts and Magic-link branding.
Images, Videos and more
Galleries can include Images, Video, YouTube videos, Instagram Posts, and more.
Gallery Layout options
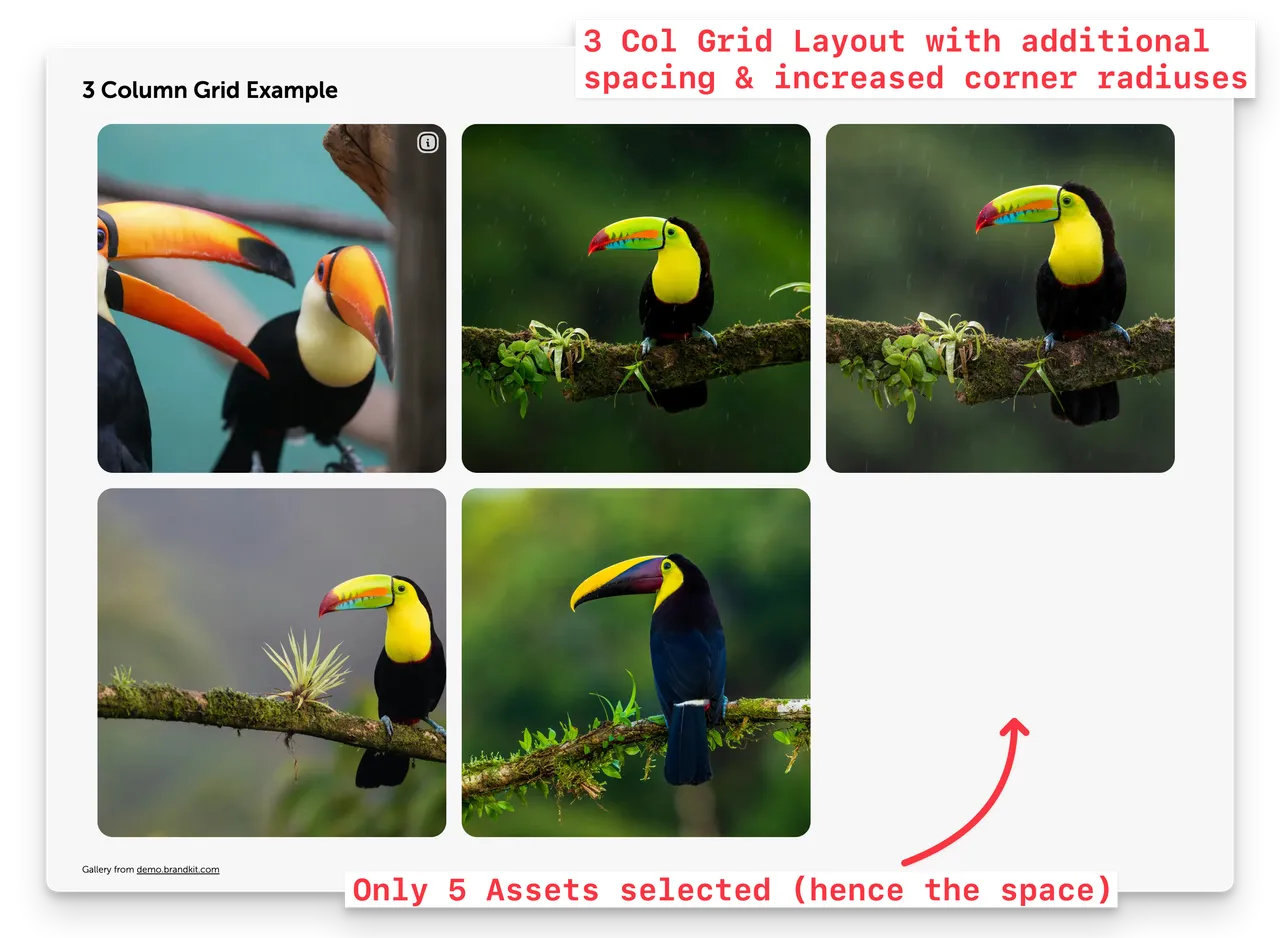
Galleries have several layout options including grid styles (e.g. Masonry, Grid), orientation options (e.g. vertical, horizontal), number of columns, padding, spacing and more.
You can set default Gallery layout and Magic Link branding for you account here. These can be overridden per individual Gallery when creating and editing a Gallery.
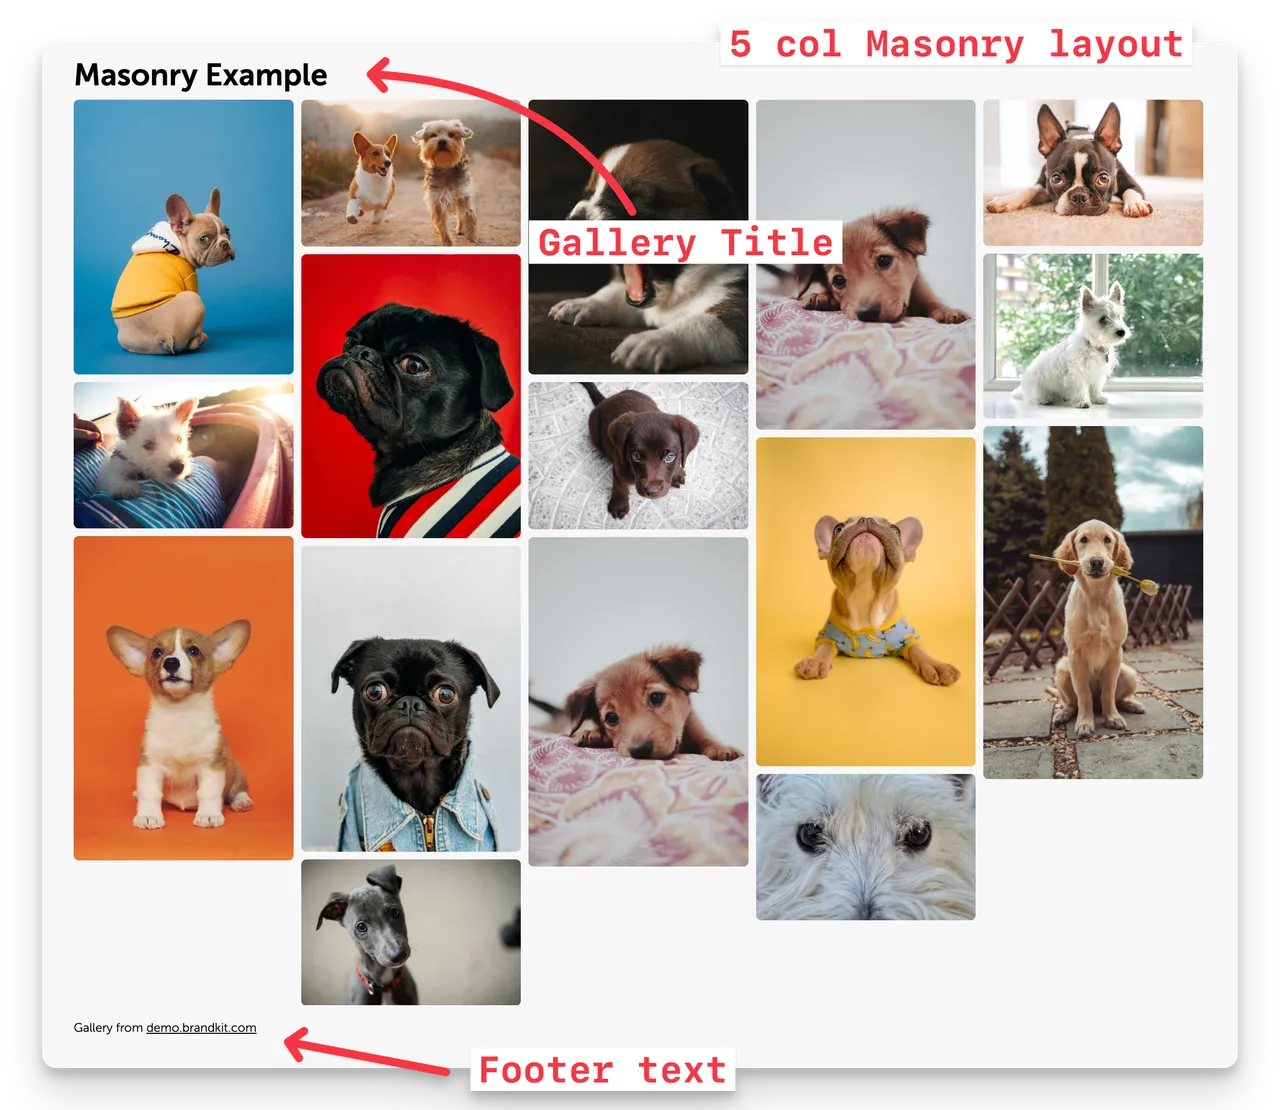
Masonry Vertical (default)
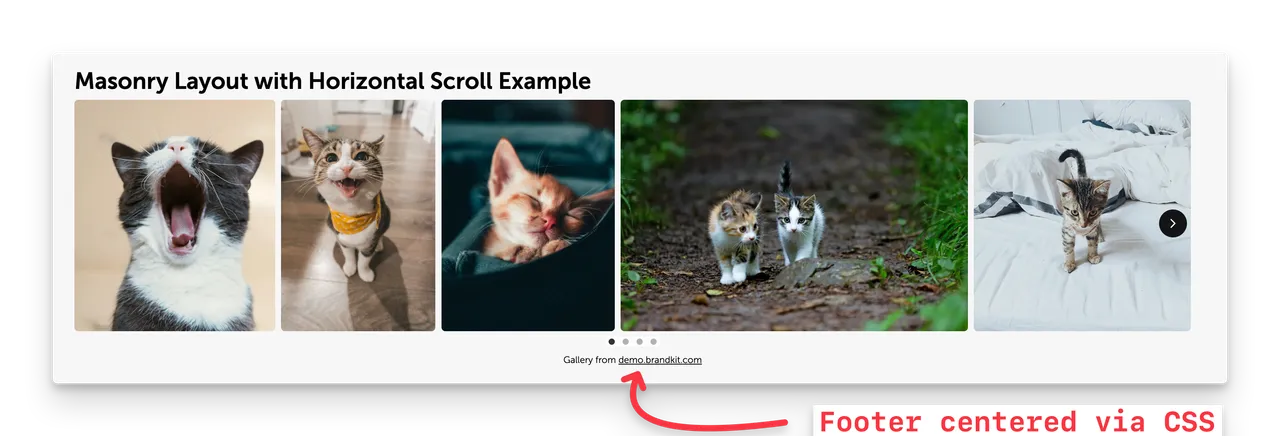
Masonry Horizontal
Grid Vertical
Magic-link branding
You can also setup a branded header for your Galleries shared by Magic-link.
Options include:
- Header background colour
- Header text colour
The Logo is taken from your Portal layout automatically so you will need to consider this when choosing header colours.
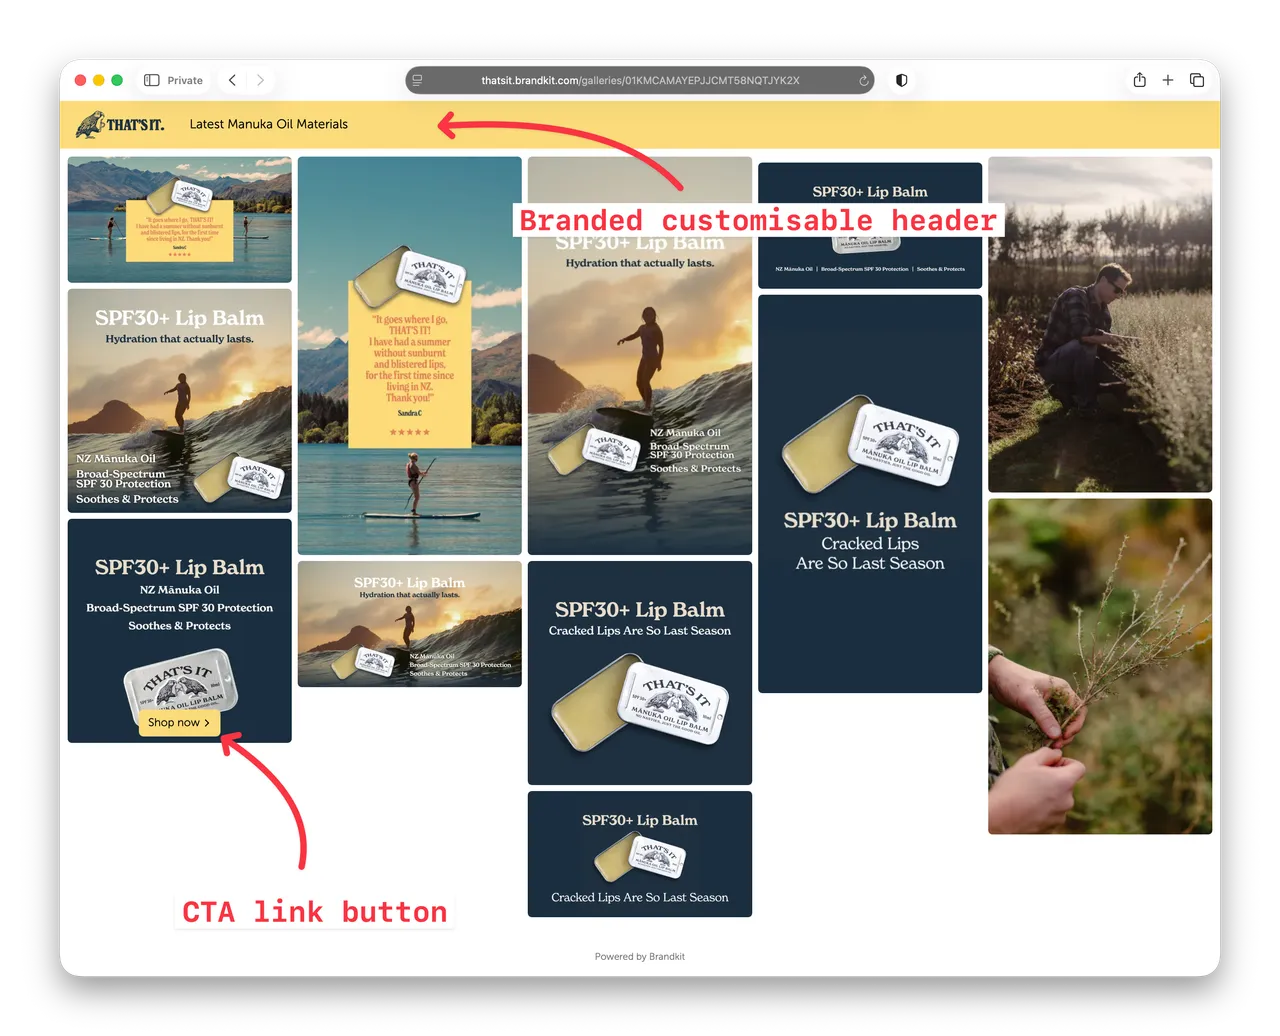
Linking Options
Brandkit Galleries include linking options for individual Gallery Items.
- By default Gallery images link to the either Asset's CTA link (added to the Asset in your Brandkit) or the Asset Page in your Brandkit Portal. CTA's have priority.
- You can disable Linking in which case we display a pop-up modal with additional Asset information including Licence details, and links to the Asset Page and/or CTA links.
The upshot of this is that you can include a compelling image or video in a Gallery that links to say a Booking page or Ecommerce page.
Note: We've also updated the CTA editing form in the Asset Page in Metadata. The new separate form makes editing CTA's easier and the button text is new free-form - so can set the button text to whatever you want
Asset Info Display
Gallery items include an Info icon on hover , that when clicked display useful Asset information, including:
- Asset Name
- Description
- Licence
- Credit
- Release Date
- Location
- Asset Page URL
- CTA URL (if one exists)
You can disable this feature also in your Gallery settings by disabling Show Asset Details.
Responsive to screen size
Galleries automatically respond (are responsive) to device screen sizes - meaning that columns and sizes will adjust automatically based on device screen-size (e.g. on a phone screen you may see one or two columns instead of 5 or 6 on desktop).
Deployment Options
There are 3 deployment options:
- Embed Code Script - copy and paste a generated Javascript snippet (recommended).
- Embed Code Iframe- copy and paste a generated Iframe snippet.
- Magic-link - copy a web URL for a stand alone gallery that can be opened in a browser.
Automatically updates
Galleries automatically update when you add or remove Assets to your Galleries in Brandkit.
So once deployed (via embed code or magic-link) you can easily update them.
Galleries items are public
Brandkit Galleries are like Transfers and bypass any Access Permissions set for the Asset, and are always publically viewable (in 3rd party websites and shared Magic-links).
When creating a Gallery, Admins must determine whether sharing the Asset in a Gallery is appropriate. We provide Admins a warning message to this effect.
Don't worry though, images shown are just previews and are not down-loadable.
Instead viewers can link to the source Asset page in your Portal where they will have to login to download (provided they have appropriate permissions), or if you have a CTA added to the Asset the viewer can link to the CTA.
Note that changes to an Asset's status (e.g. you Archive an Asset, An Asset reaches it's expiry date, etc), will impact the visibility of previously selected Assets, in deployed Galleries in real-time. Only Active state Assets will be displayed.
How It Works
Two basic workflows to create a gallery:
Via Galleries page
- Create a Gallery from scratch in Admin > Galleries
- Name the Gallery
- Add a Heading if required
- Select Display Options
- Add some Assets (you will be able to Search for and select Assets)
- Click Embed Customisation & Preview to adjust layout and styling.
- Preview your Gallery and adjust if necessary
- Save
- Copy the Embed Code (we recommend the Script option). Use the Iframe option if you cannot us the Script version.
- Paste into your 3rd party web page, or pass the embed code to your web developer. You can also embed Galleries in your Brandkit Portal pages - via the Brandkit CMS by pasting into an HTML Section.
Via Basket
- Select Assets to include in the Gallery so that they are in your Basket
- Click Save in the Basket > then select Gallery > then New Gallery
- Name the Gallery
- Add a Heading if required
- Select Display Options
- Click Embed Customisation & Preview to adjust layout and styling.
- Preview your Gallery and adjust if necessary
- Save
- Copy the Embed Code (we recommend the Script option). Use the Iframe option if you cannot us the Script version.
- Paste into your 3rd party web page, or pass the embed code to your web developer. You can also embed Galleries in your Brandkit Portal pages - via the Brandkit CMS by pasting into an HTML Section.
Once deployed to your website (or magic-link) you can more or less forget about it. As you add or remove Assets to your Gallery in Brandkit, your embedded or shared Gallery will be updated automatically in real time.
Key features:
- Automatic updates from your approved Brandkit image assets.
- You can select your preferred sort order (e.g. Latest, Most Viewed, etc).
- You can configure a Gallery Heading, How many images to show, the number of columns, and whether you show an image title and credit, in your gallery.
- Images are linked to the relevant asset page in your Brandkit portal.
- You can embed multiple Galleries in one or many sites, or you can embed a single gallery in many sites.
- Gallery images are delivered via our Global CDN with over 400 points of presence globally.
- Views of Images in your external galleries will be shown in your Brandkit analytics.
Why It Matters
You've already created or curated and uploaded your images and video, tagged and approved them. Why add another manual step?
Update-able galleries eliminate the work of having to replace embed code, or manually updating galleries when you have new Images or videos to show.
And Brandkit's Brand-safe visibility rules ensure private assets are not shown inadvertently.
Your team can now focus on strategy, creating or curating new content, while your website stays current —automatically.
Getting Started
The feature is now available upon request.
- Ask your [Brandkit Account Manager](/contact or Brandkit Support to demonstrate and activate the feature in your account.
- Configure your default Gallery layout, Magic-link header and CTA button styles - Settings > Galleries.
- Create a Gallery by (a) Saving selected Assets in a Basket to a New Gallery via the Save button, or (b) Click the + New Gallery button from the Galleries page - Assets > Galleries
- Once you have have selected your Assets, Customise & Preview the Gallery (you can overide any config setup in step 2 above for each Gallery).
- Choose your preferred deploy option (Script, Iframe, Magic-link)
- Deploy to your website by pasting the embed in to your web page HTM or sharing the Magic-link.
- You may need to add a Content Security Policy (CSP) rule to ensure the images can be show on your website - and we include a CSP declaration that you can copy.
- Check each embedded location and Magic-link, review and make any necessary changes required. Note that while Assets can be added and removed in real time. Changes in layout will need to be re-deployed.
We recommend embedded galleries should be set up to show 15 to 20 images across 5 columns. But if your page layout is narrow you may want to reduce the number of columns.
Managing Your Galleries
Keep content seasonal. Swap out or archive assets that don't match current campaigns or seasons.
Monitor performance. Brandkit tracks engagement, so if you sort by Most Views, your best-performing images will be surfaced first.
Public, Approved and Tagged content. Ensure images are saved in a publicly viewable Vault, Approved and have an Active status, to include them in your Galleries.
Disabling a Gallery
Sometimes you may want to disable a Gallery you have shared via an Embed or a Magic Link.
You can delete the Gallery and the embed or magic link will simply stop working.
You should also "clean-up" any web pages where you have pasted that embed code or Magic-links you have shared..
What about UGC
You can include User Generated Content (UGC) in your embedded Image Galleries.
Once you find an image you want to use from social media, influencers, or partners —ask them to upload their original high res images via Brandkit's Contribution (Public Upload) workflow.
You may need to enable this in your User Role settings - Settings > User Roles.
You will need to invite each user to the Contribution workflow in your Brandkit Portal.
Don't rely on the images scraped from Social Media (e.g. Instagram™) etc as these are down-sampled low res versions with limitations,
Once the user has contributed an image, your Admins can Accept, Classify, Tag, add any CTA links, and Approve it as a published Asset,. Then they can add it to a Gallery —where it it will appear in the deployed Gallery automatically.
We always recommend you add attribution to the contributor, with a Credit in the Asset details, and turn on Show Asset Details in your Gallery settings if you use any UGC (or partner) content.
3 Tips for Curating Awesome Image Galleries
Update-able Galleries handle the heavy lifting, but you'll still want to ensure your content stays relevant to campaigns, seasons, and brand messaging.
1. Align with Active Campaigns
Match your gallery content to what you're promoting right now. Launching a new product line? Feature those assets. Running a seasonal campaign? Swap in relevant imagery. Your galleries should reflect your current marketing priorities, not last quarter's focus.
2. Keep Content Seasonal
Update galleries to match the calendar. Holiday campaigns, seasonal products, and time-sensitive promotions need fresh visuals. Set quarterly reminders to review your galleries, change out the albums search query, and archive outdated content. Even evergreen galleries benefit from periodic refreshes to stay current.
3. Maintain Brand Consistency
Your galleries represent your brand on partner sites and landing pages. Regularly check that featured images align with current brand guidelines, messaging, and visual standards. If your brand evolves, your galleries should too.
Pro tips:
- Use Brandkit's performance tracking to identify which images resonate most, then apply those insights to future content selection.
- Use an Gallery Name and Heading that is flexible enough to use with multiple Assets so if you change the Asset selection in the future the name still makes sense (e.g. Corporate Site Image Gallery or Hero Image Gallery)
Reporting
Galleries Page
The Galleries page in Admin > Assets Galleries includes a green Traffic-light indicator when the Gallery is active and receiving requests.
Clicking the embed link will also display the last time the Gallery was viewed (e.g. Last viewed 9 minutes ago).
Reports - Content Analytics Dashboard
Gallery images are delivered to Galleries via the Brandkit CDN (Content Delivery Network) and so any viewing of Galleries (whether is 3rd party websites or in shared Magic-links) will be reflected in CDN traffic and Account Usage in the dashboard.
CSS Styling
You can target HTML elements in the embedded Gallery and style Gallery elements to match your destination website - using the CSS of the destination website.
div.bk-embed-container {your styles} /*--Gallery container--*/

span.bk-embed-heading {your styles} /*--Gallery Heading text--*/

span.bk-embed-footer {your styles} /*--Gallery Footer text--*/
The Gallery Heading is editable in your Gallery Settings,
The Gallery Footer text displays the following text with a link: Gallery from {Your Primary Account URL}. You can disable this footer text in the Gallery settings - but you must redeploy if you are making a change to an existing Gallery,
Check it out
Since this new feature is already available (Brandkit support may need to activate for you during the BETA period) - go ahead and try it and see how easy it is.
Questions?
Check the Brandkit Help Centre or contact support.
Not using Brandkit yet? Book a demo to see how we simplify digital asset management.
Happy branding :)
New embeddable Galleries feature in Brandkit
Brandkit launches a brand new Galleries feature. Your content should work as hard as you do. That’s why we’ve introduced a new deployable Galleries feature, You can now embed an update-able Image Gallery in 3rd party websites and web pages or share a gallery via a Magic-link