Brandkit Operating Manual
For Admins and Owners
This manual covers everything you need to configure and manage your Brandkit account. Work through the setup checklist to get started, or search for any topic using the search bar above.
For Admins and Owners
This manual covers everything you need to configure and manage your Brandkit account. Work through the setup checklist to get started, or search for any topic using the search bar above.
This manual is written for Brandkit customer Admins and Owners — the people responsible for setting up, configuring, and maintaining a Brandkit account. Owner — full access to all settings, billing, and account management. Admin — full access to content and configuration, with the exception of billing and plan management. Regular users (those who browse and download assets) have a separate, simpler interface and are not covered here.
Each article covers one area of the platform. Use the search bar to find what you need, or browse by section using the index page.
When you first set up a Brandkit account, work through these steps in order. Each links to a more detailed article.
Go to Admin > Settings > General and set your account name, legal name, primary contact email, login wall logo and background image, and more.
Pro and Enterprise editions only.
Go to Admin > CMS > Portal to configure your public-facing brand portal — the site your users will visit to access assets.
Note that typically the Brandkit team will do the initial Portal setup for you, including optional custom design.
Go to Admin > Settings > User roles to review and customise the access levels available on your account. Defaults include Owner, Admin, Staff, Standard and Public.
Go to Admin > Users > Invitations to invite Admins and other team members.
Go to Admin > Assets > + Upload files (in the left hand sub-menu) or use + Add button in the top right navbar (in Admin), to upload your first files.
Go to Admin > Assets > Albums / Collections to group assets into logical collections for easier browsing.
Go to Admin > Settings > Downloads to control how users download assets — including whether a custom form is required.
Go to Admin > Settings > Notifications to set up email alerts for key events such as new users, expired assets, etc
Pro and Enterprise editions only.
Go to Admin > CMS > Themes to apply your brand colours and fonts, etc (CSS) to your portal design.
Once configured, share your portal URL with your team and any other users.
The To do section is your admin action centre. It surfaces items that need your attention and shows a live count badge on the left sidebar so you always know when something is waiting.
To access it, in Admin, click To do in the left sidebar.
What you'll find here:
Users who don't have automatic download access can request assets. Each request shows the user, the asset they want, and any message they included. You can approve or decline from here.
To configure who needs to submit a request, go to Settings > User Roles > select Role > update permissions.
Assets uploaded to Brandkit are always set to the Draft state by default and must be Approved before they appear in the Portal. This queue shows all assets waiting for review. Generally you should ensure the Asset is in the right Vault, have the correct Asset name, Metadata and Tags before you approve an Asset.
If you allow external contributors to submit assets (via the Contribution link/work-flow), those submissions appear here for review and acceptance. You can accept, or reject individual files or all files as a batch. Once accepted we will create an Asset in a draft state for further review and approval.
To configure contribution settings, go to Settings › Contributions.
The Assets section is the heart of Brandkit. It's where you manage your entire brand library — uploading, organising, searching, and controlling what users can see and download.
Click Assets in the left sidebar to open it.
The default view is the Grid.
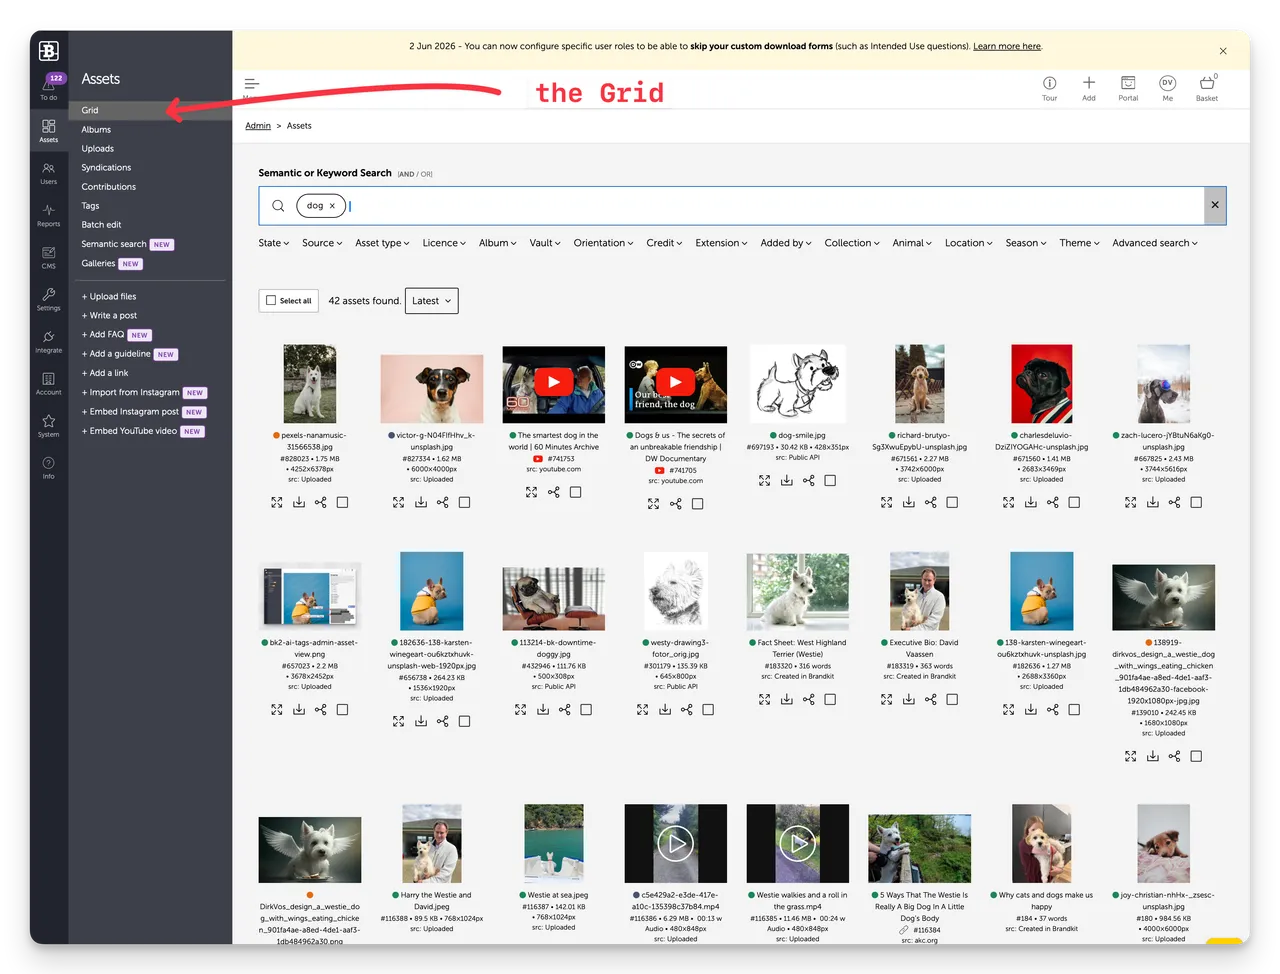
The Grid shows all assets in your library as thumbnails. It is the primary way to browse, search, and manage your content.
At the top of the Grid is a search bar that supports both keyword and semantic search. Below it, a row of filter dropdowns lets you narrow results by:
State, Source, Asset type, Licence, Album, Vault, Orientation, Credit, Extension, Added by, Collection, Blog topic, Brand guidelines, Category, Competitors, Help topic, Industry, Resources, SEO keywords
Use AND / OR toggle to control whether multiple filters narrow or broaden your results.
Assets can be in one of several states:

You can further refine your search results by selecting a standard filter dropdown to add an additional search facet (search parameter).
These include:
You can further refine your search results by selecting a custom filter dropdown to add an additional search facet (search parameter).
You set these up in (1) Settings > (2) Filters to match the way your company categorizes your own content.

An example for a Place Brand organization might be by theme:
Theme
Use the sort dropdown (default: Latest) to reorder results by date, name, or other criteria.
Each asset card shows:
Tick the checkbox on one or more asset cards to select them, or use Select all to select the full result set. Selected assets are added to the Basket for bulk actions.
Click the Thumbnail or name of the Asset to open the Asset's detail page.
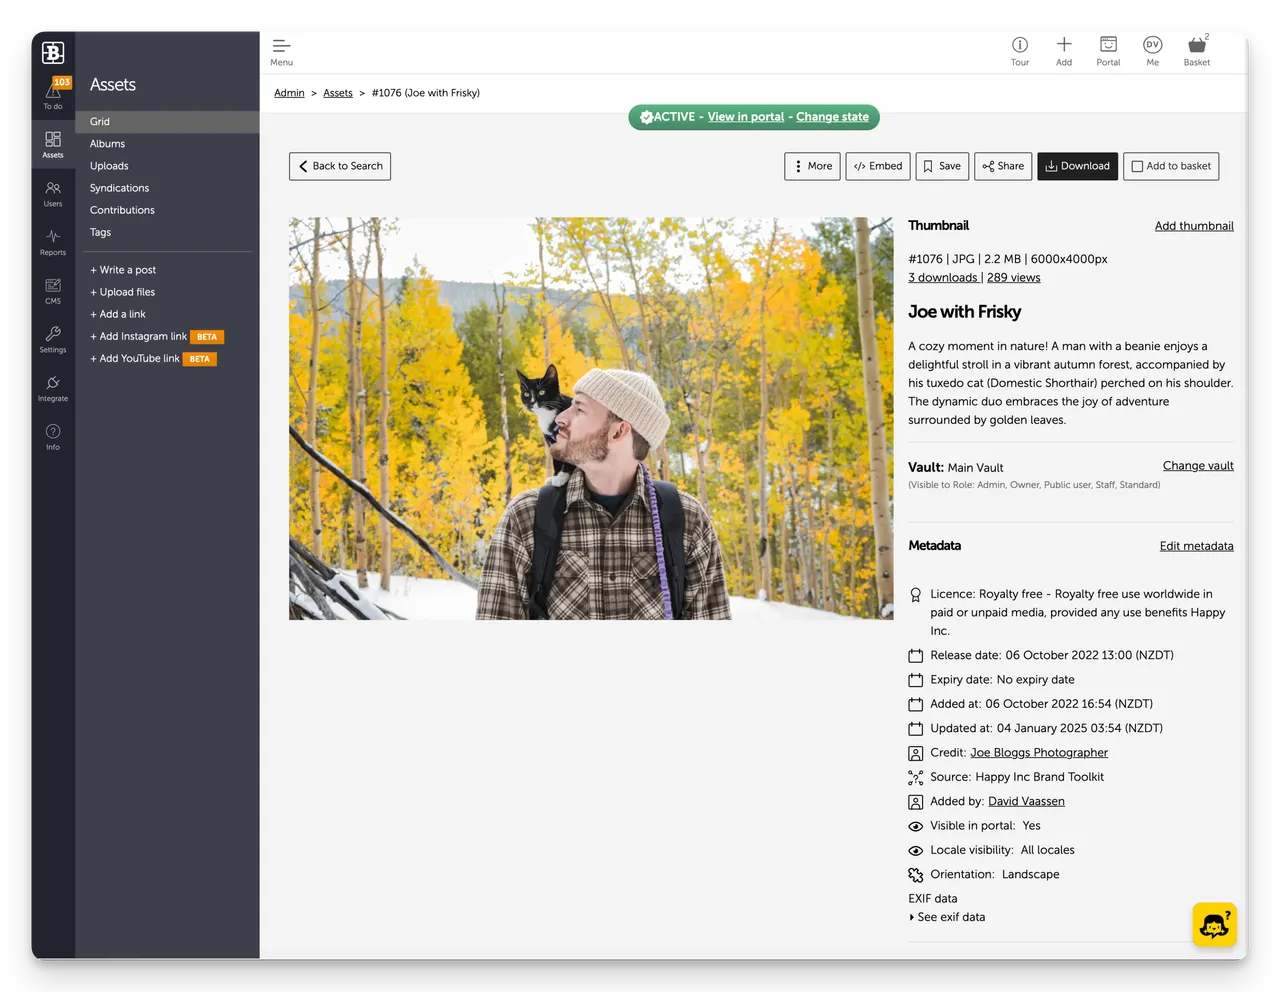
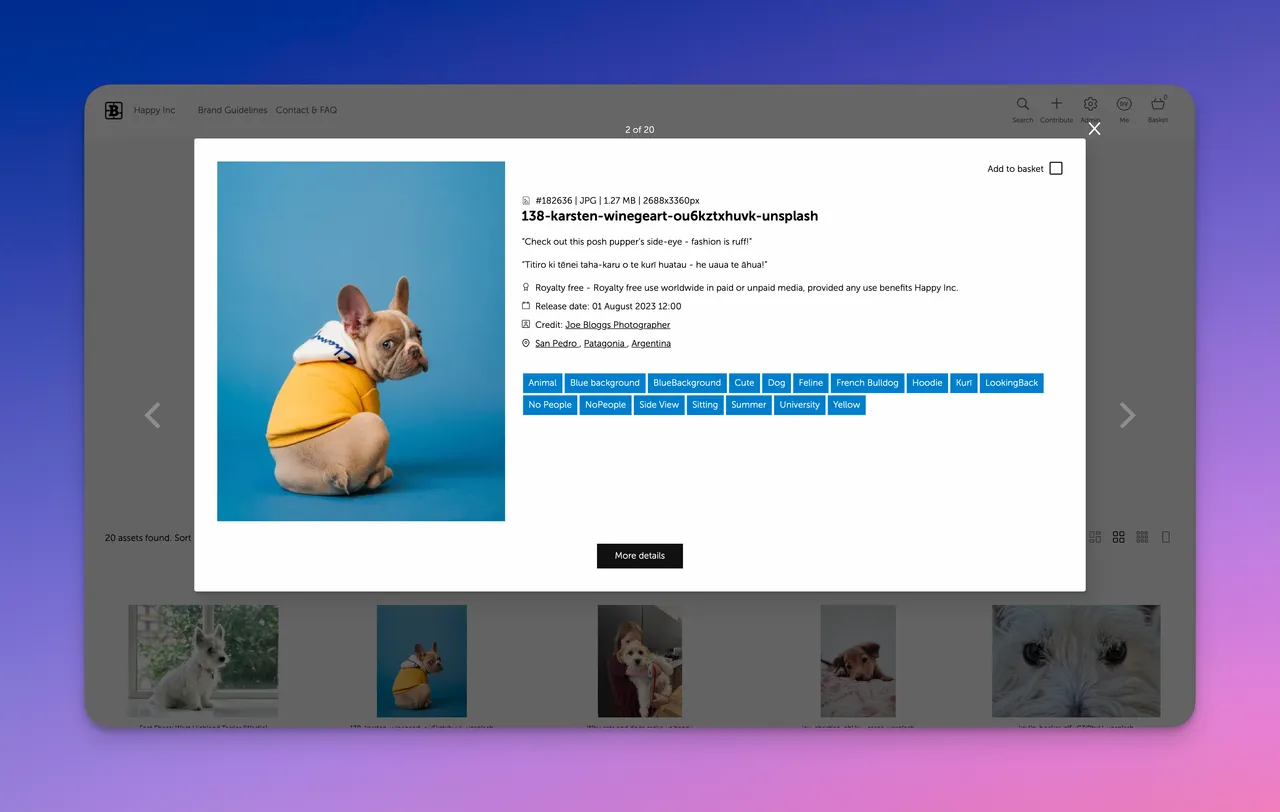
In some cases if you have the Asset Preview Modal feature enabled in your settings (Settings > General) clicking an Asset in the Grid will open a modal with a further click of the More details button required to see the Asset's page.
Pro Tip: If the Preview Modal option is enabled you can click the additional (far left) icon under the Assets in the Grid to open the Asset page directly.
You can also Download and Share one asset at a time directly from the Grid by selecting the Download or Share icon underneath each Asset in the Grid.
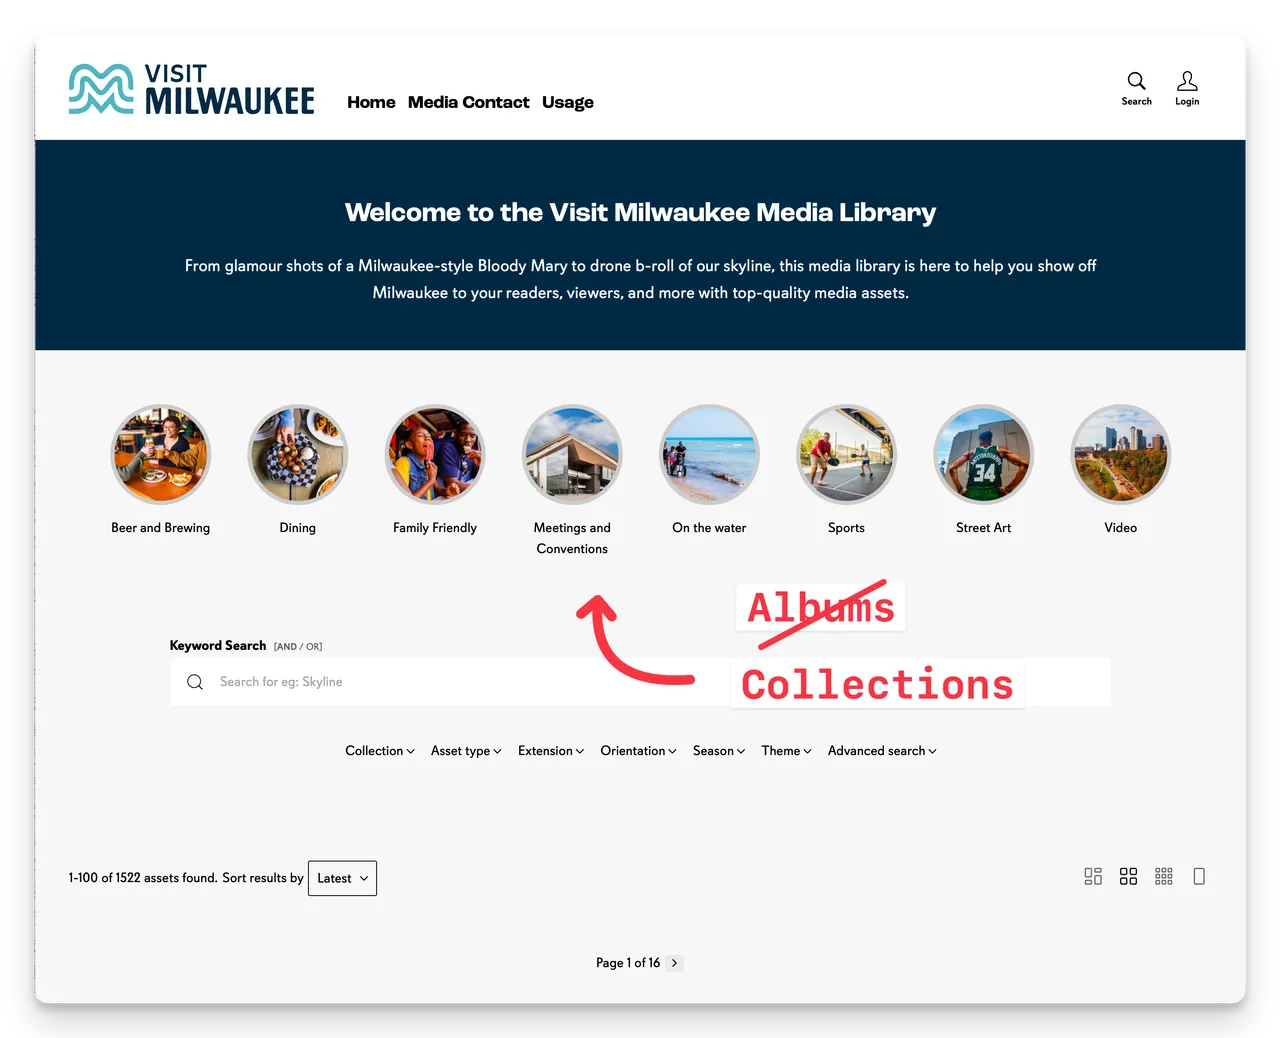
Collections (previoulsy called Albums) are an important way to organise assets into browsable collections. Think of them as folders, but more flexible — an asset can appear in multiple collections, and collections automatically update based on the saved search query (if query based) or you add new Assets to collections based on explicit selections.
Go to Admin > Assets > Collections to manage them.
Collections are typically based on a saved Search Query.
Assets are added to Collections automatically based on the saved Search Query (e.g. Al assets tagged: Waterfall)
To add a new Asset to the Collection just upload or create an Asset and edit the metadata or tags so it meets the Search Query parameters for the Collection (e.g. add the tag: Waterfall)
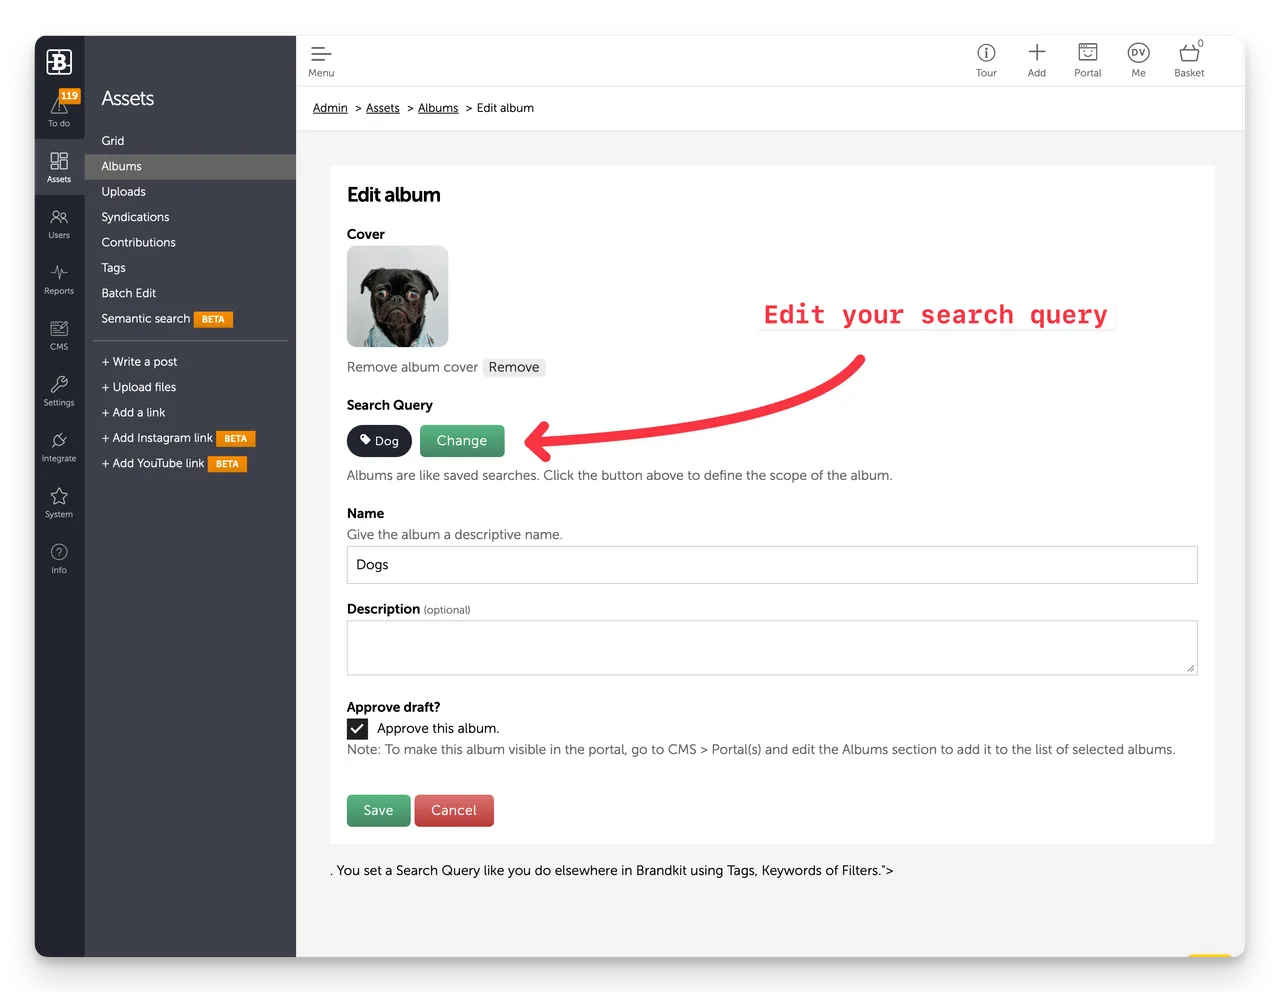
e.g. if the Search Query is set to find Assets tagged with "Dog", just upload a new image and tag it Dog (and Approve it to publish). Because the Tag matches the Collection's Search Query the new image will be shown in the Album.
You can also:
Collections can also be based on explicitly selected Assets.
Assets are added manually to Collections by explicitly selecting them.
To add a new Asset to the Collection edit the Collection and select Assets from the Asset library.
You can also:
Collections by default are displayed in the standard Portal design layouts on the home page - but for Pro and Enterprise Edition accounts Collections may appear elsewhere.
The Uploads page display a log of every upload to your Brandkit — who uploaded it, and when. Use it to monitor uploads, or to select the Assets from past uploads.
Top Tip: You can select past uploads for additional batch processing via the basket.
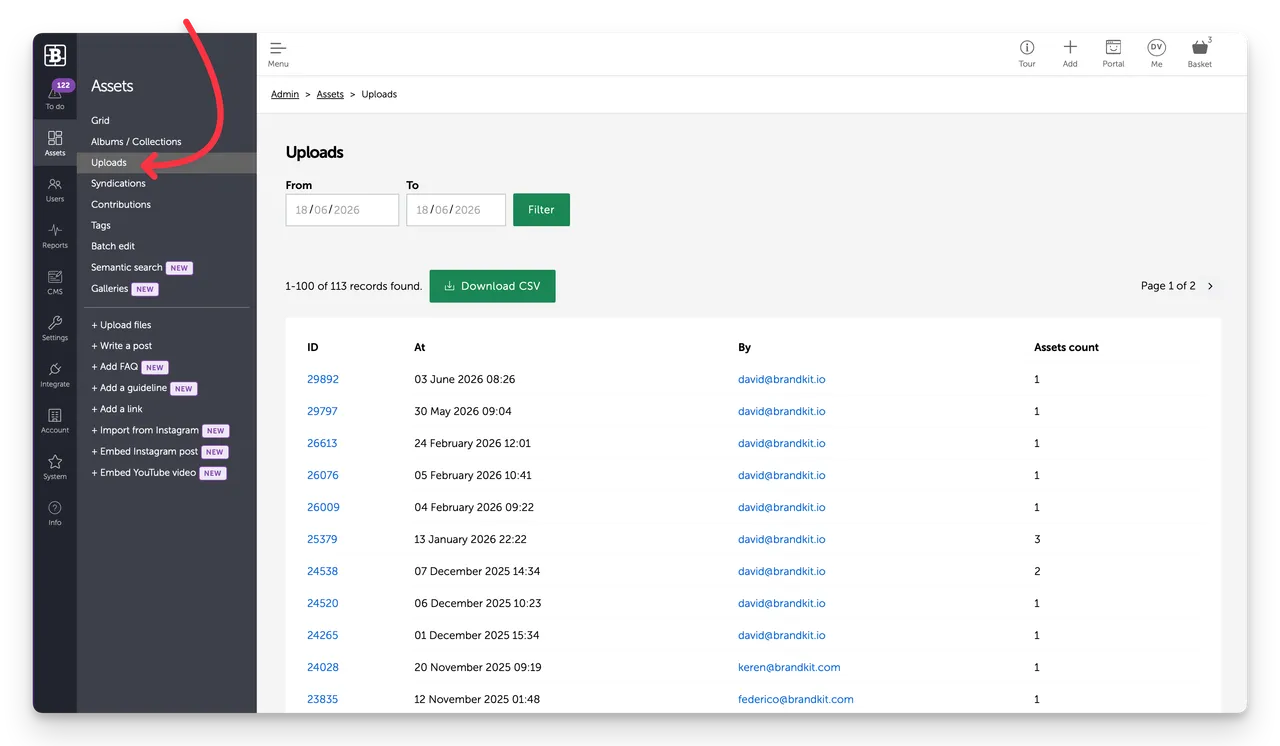
The uploads page shows a log of uploads over time. This view is paginated, showing 100 rows per page.
Each row shows:
In addition you can:
When you click the Upload ID on any row in the Uploads Log, you will open the Upload detail view.
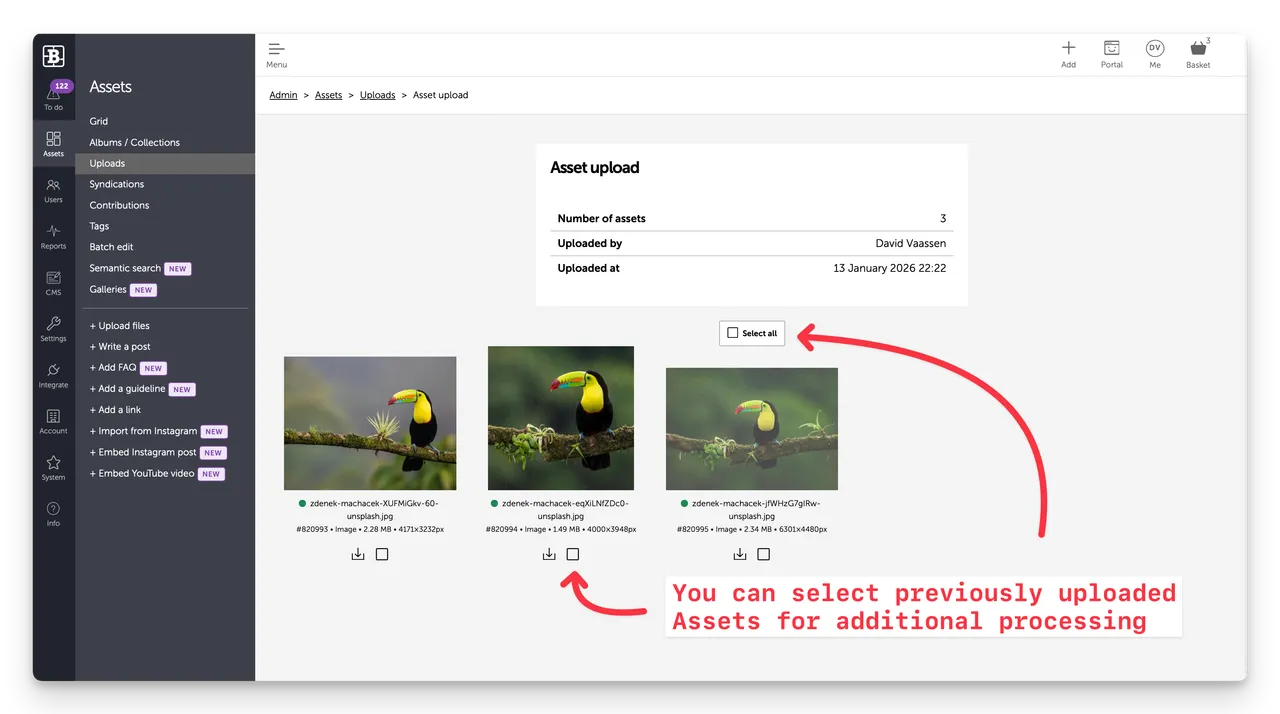
This display a summary of the upload logo details and a grid of the Assets uploaded.
From here you can select one, multiple or all Assets in the upload. This adds them to your Basket where you can batch edit or tag those selected Assets.
Top-tip: You can go back in time to previous uploads, select Assets and batch edit/tag them. Very handy.
There are two ways to add files to the library:
From the upper right navbar select the + Add button —a file picker opens. Select one or more files and confirm.
From the Asssets sub-nav, select the + Upload file button —a file picker opens. Select one or more files and confirm.
To control who can upload go to Admin > Settings > User roles.
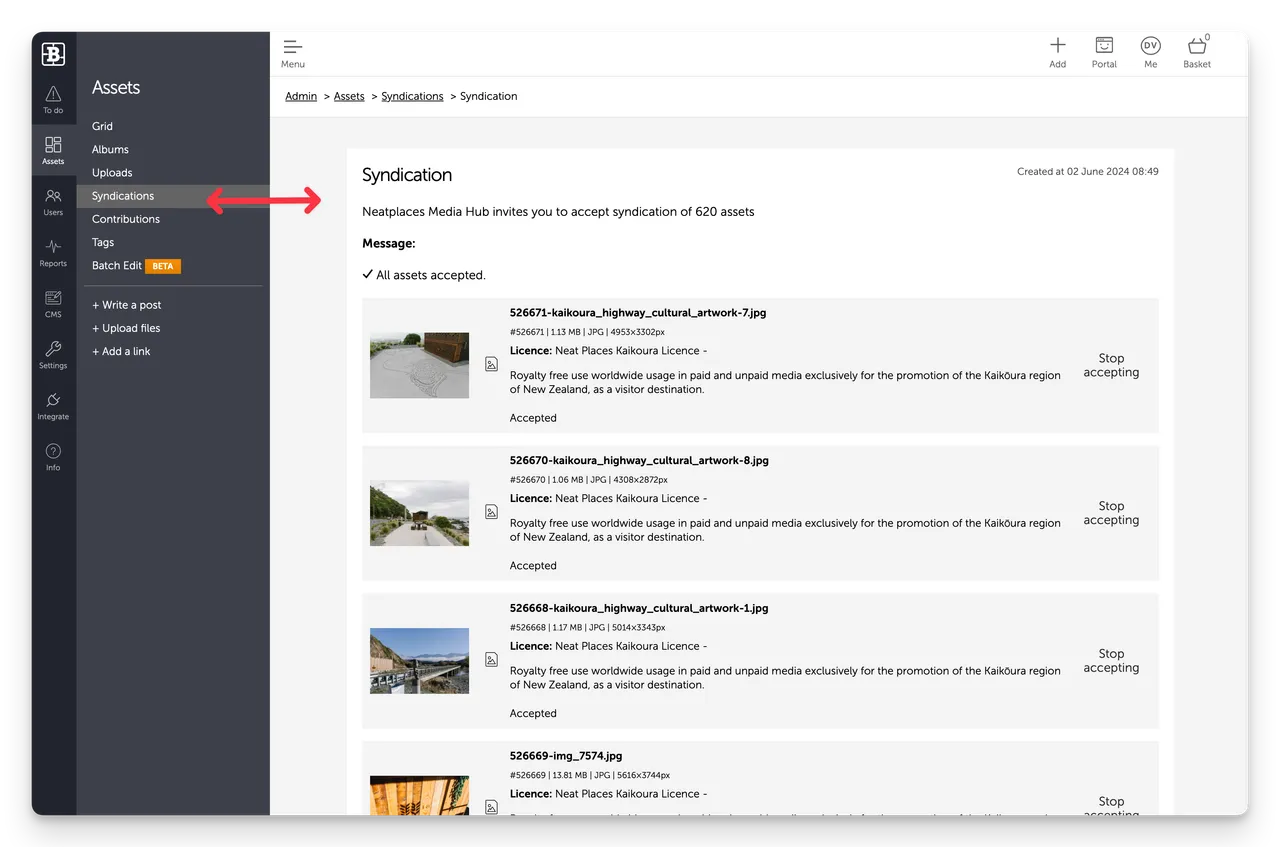
Syndications let you push and pull assets out of or into your Brandkit to or from another connected Brandkit account — such as a partner brand, agency, or another Brandkit account. Syndicated assets stay in sync with their source automatically.
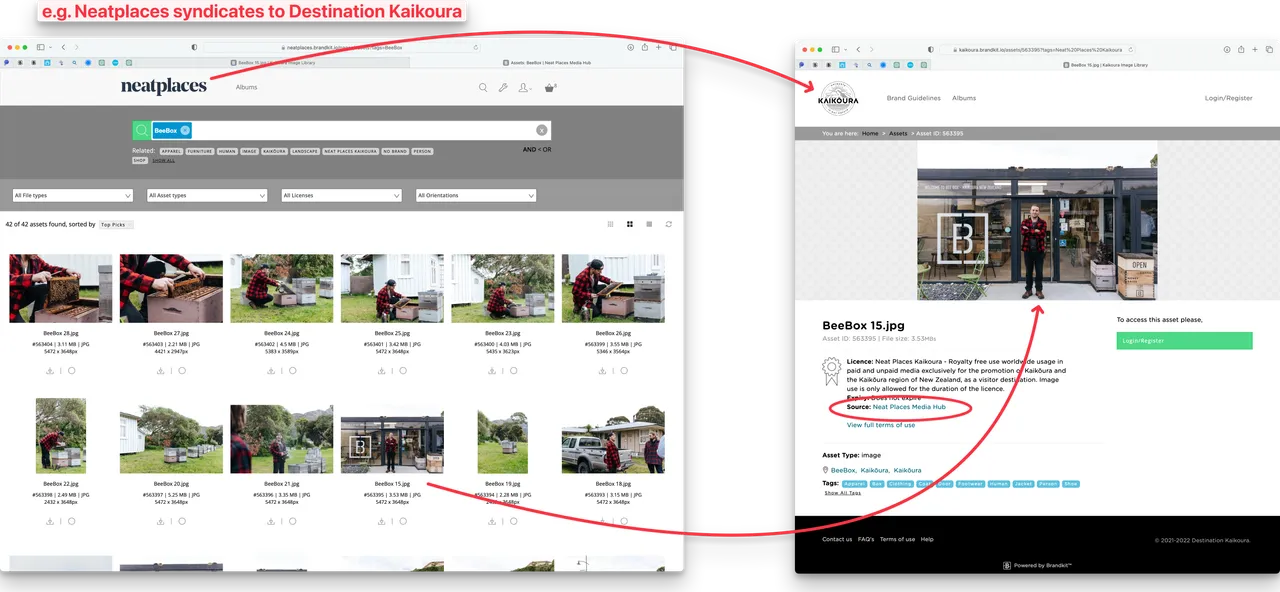
Content Syndication feature overview
A Syndication (or Syndicated Asset) is an Asset owned and stored in one account (the source account), shown and downloadable from another account (the receiving account).
Syndication requires that a Source Account and Receiving account are connected (see below), and that the Source Account explicitly syndicates an Asset, and the Receiving account explicitly accepts the syndicated Asset.
.
Syndicated Assets update automatically no matter where they are shown, based on any changes made in the Source Account.
Useful for:
Before any Syndication can take place, any participating accounts must be connected.
For Inbound account connections you can also set a default Vault and whether you want to automatically accept Syndications (rather than having to explicitly accept individual Assets).
Once your Account Connections are setup (outbound), you can syndicate Assets out (you are the Source account) from your Basket.
You will be able to see your Syndications in the Admin > Assets > Syndications, including a link to view details of each Syndication, and the ability to Stop Syndicating for individual Assets.
Syndicated assets appear alongside uploaded assets in your library. However these inbound Syndicated assets belong to the source account - and so you have limited ability to manage these Assets and generally you cannot edit them at all m- with a couple of exceptions.
You can:
Note: syndicated assets cannot be edited directly — changes must be made at the source.
This will remove individual syndicated Assets
To remove all Syndicated Assets, simply remove the Account Connection
This will prevent any new syndications from that account and remove any currently Syndicated Assets.
Outbound Syndicated assets are just normal Assets in your own Brandkit. Just manage and edit them as you would normally.
Note that only Active Assets can be syndicated. Any ASsset that is not visible in your Portal (e.g. Expired, Archived, Not yet Released, Deleted, etc) will not be visible in the Receiving Account
You can find a list of Assets that you have Syndicated outwards in the Syndications page.
To stop Syndicating outbound Assets
This will stop syndication of individual Assets.
To stop all outbound Syndication of Assets to a connected Account, simply remove the Account Connection
This will prevent any new syndications to that account and stop syndicating any currently Syndicated Assets.

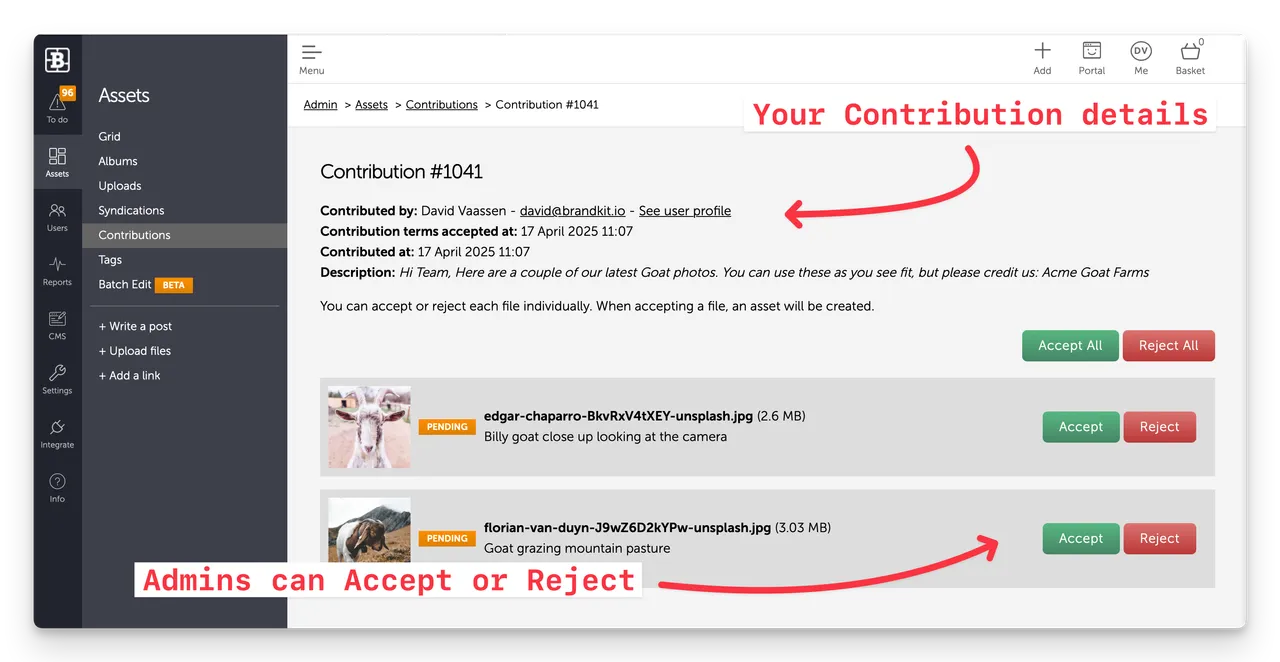
Contributions lets photographers, agencies, staff and other non Admin users submit (contribute) files directly to your Brandkit, which go into a moderation queue for review and acceptance by Admins, rather than publishing directly.
See Contribution Feature Overview

Registered users can click the Contribute button (or can be sent a link to the Contribution page) in the Portal to access the Contribution workflow and follow predefined steps in order to contribute (upload) files:
Admin users are then notified (by email and To Do list) about new Contributions, and can Review and Accept a Contribution (or individual files) to create new Assets.
Users must be registered and logged in to Contribute.
However the Contribute button and the ability to Contribute is determined by User Role settings.
You'll need to enable the Contribute Assets Ability for each User Role you want to be able to Contribute.
There are global configuration options for Contributions that apply to all Contributions in your account.
Users who have the Ability enabled for their User Role can submit a Contribution via the Contribute button.
This Contribution will be listed in their user history and user profile audit trail.
Users can see their Contribution history under the Me menu
Me > My Contributions
All Admins will receive an email notification (provided they have not unsubscribed from the Contribution notification in their Profile). Plus any new Contributions will appear in the To Do list (Admin > To Do)
Tags are keywords attached to assets that make them easier to find via search. The Tags page is essentially the Master Tag List for your Brandkit and is a centralised place to review, clean up, and manage all the tags used across your Brandkit account.
Navigate to Admin > Assets > Tags
The Tags List show a paginated and filterable view of every tag in use across your Brandkit, with a count showing how many assets carry each one.
The List view is split into 6 columns:
Tags can be added on this page but are not applied to Asset here. Tags are mostly added directly to Assets when tagging an Asset either one at a time or via a batch tagging process in the Basket, or by AI when auto-tagging, or by being extracted from uploaded file metadata.
Tags in the master tag list will be used as type-ahead suggestions when tagging Assets, or searching for Assets.
Batch Edit is a limited feature that lets you Approve, Unapproved, Archive or Restore from Archive large selection of Assets without having to use the Basket.
Warning: Use this feature carefully. As there may be unintended consequences.
Navigate to Admin > Assets > Batch Edit
Warning: Use this feature carefully. As there may be unintended consequences.
Semantic search lets users find assets by meaning, not just exact keywords. Instead of matching tag or file name text, it understands the intent behind a search query and returns conceptually relevant results.
For example, searching for "summer outdoor lifestyle" can surface relevant photos even if those words don't appear in the asset's tags or title.
This Menu Item is for Brandkit Staff Staff System Admins only.
Brandkit uses AI-powered embeddings (via OpenAI) to analyse and index your assets. When a user runs a semantic search, the query is matched against this index to find the closest conceptual matches.
Semantic search works alongside — not instead of — keyword search. Users can switch between the two from the search bar on the Grid.
Semantic search requires OpenAI embedding to be active on your account. This generate Search Vectors for Assets and enabled Semantic Search in your account
To check or enable this:
Once enabled, your new assets will automatically generate Search Vectors as they are uploaded. However existing Assets in your account prior to Semantic Search being enabled will have to be Indexed. The Admin > Assets > Semantic Search page can be used to generate Search Vectors for existing Assets.
Note: Semantic Search is not available to Public Users (any user not logged in) to help prevent rate limitation issues and abuse. Noting that every embedding process and every semantic search consumes some tokens.
AI Tokens used for the AI embedding process (generating Search Vectors) and tokens used for semantic search are recorded and displayed in the Reports section and your account dashboard.
To see how often semantic search is being used and the queries being run, go to:
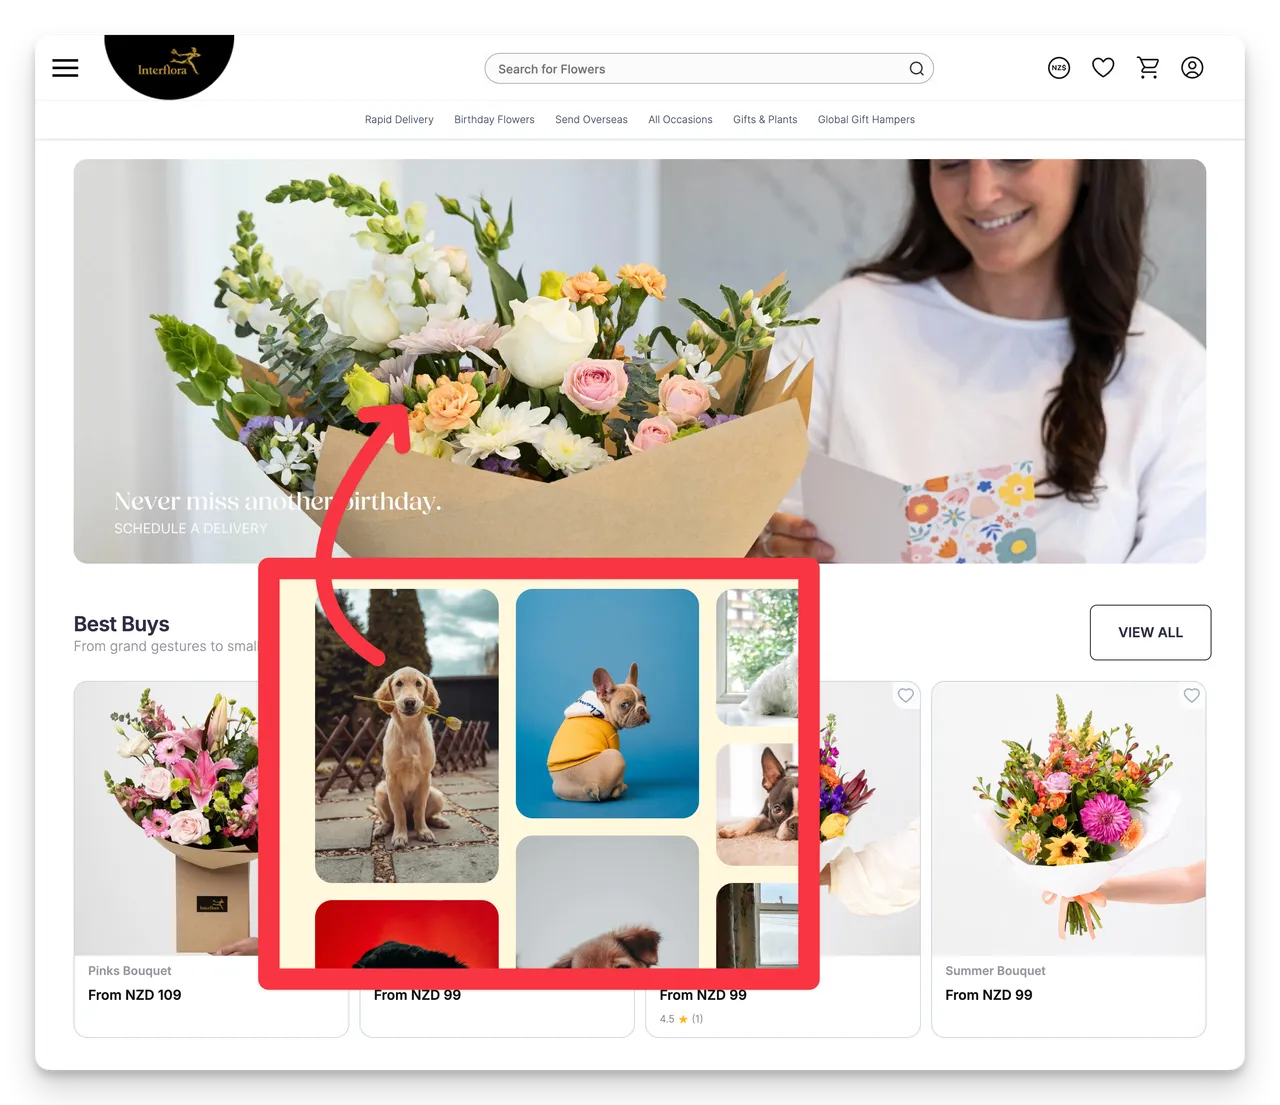
Galleries are curated, visual presentations of assets — designed for sharing with external audiences such as media, partners, or clients. Unlike albums/collections (which are internal library organisation tools), galleries are public-facing and presentation-focused.
They can be shared via a magic link, or be embedded in emails , web pages, and 3rd party websites.
| | Albums | Galleries |
|---|---|---|
| Purpose | Organise the internal library | Present assets to an external audience |
| Audience | Portal users | Anyone with the link |
| Access control | Role-based | Link-based (no login required) |
| Appearance | Standard library grid | Branded, presentation layout |
(Fig: An actual embedded Gallery - using an iframe)
From the Galleries list you can:
Note: While adding Assets or editing Assets included in Galleries will automatically update a previously shared or embedded Gallery - changes to layout and branding will not. You will need need to re-share or re-embed your Galleries for those changes to be seen.
To configure default gallery behaviour across your account, navigate to Admin > Settings > Galleries.
Options include:
The bottom section of the Assets sub-nav contains quick add shortcuts — a fast way to add different types of content to the library without navigating away from your current view.
A slightly quicker way to add Assets instead of clicking the + Add button in the top right nav.
Opens a file picker to upload one or more files directly to the library. Files enter the standard upload and approval workflow.
Creates a new text-based post asset — useful for announcements, brand stories, press releases, or any written content you want to store and share alongside visual assets.
The post editor supports rich text formatting, images, embeds, and links.
Creates a new FAQ entry. FAQs are a content type in Brandkit designed for short question-and-answer articles (you are reading one right now - Ed) — useful for Q&A, usage instructions, or internal knowledge base content.
FAQs can be tagged, organised, searched, and surfaced on CMS pages using the FAQs smart section component. This Operating Manual is itself built from FAQ articles.
Creates a new guideline article — a structured content type for documenting brand standards such as logo usage rules, colour specifications, typography guidelines, and tone of voice.
can be tagged, organised, searched, and surfaced on CMS pages using the Guidelines smart section component.
Adds an external URL as an asset in the library. The link appears as a Asset card in the Grid and can be tagged, organised into albums, and shared like any other asset.
Useful for referencing earned media (e.g. press article), external tools, brand resources, or third-party content without uploading files.
Connects to your Instagram Business Account and your imports posts as assets into the library. Imported posts include the image and original caption as metadata.
These Assets are downloadable from your Brandkit.
To configure the Instagram connection first, go to Admin > Integrate > Instagram.
Adds a specific Instagram post to the library as an embedded asset, using a post URL. The post renders as a live embed rather than a static image.
These Assets are NOT downloadable from your Brandkit. When a user click the Asset they are taken to the original post on Instagram.com
Adds a YouTube video to the library as an embedded asset, using the video URL. The video renders as a playable embed in the Grid and on asset detail pages.
These Assets are NOT downloadable from your Brandkit. When a user click the Asset they are taken to the original post on YouTube.com
The Users section is where you manage everyone who is registered t have access to your Brandkit account. You can invite new users, review download requests, and communicate with your users — all from one place.
Navigate to Admin > Users in the left sidebar.
User Roles define what each user can see and do on your portal. Roles are configured in Admin > Settings > User roles and assigned when a user is invited or when an Admin manually changes a user's User Role.
User attributes are custom profile fields you can add to user accounts — useful for capturing team, location, or department information. Configure them in Admin > Settings > User attributes.
Authentication controls how users log in — password, SSO, or other methods. Configure in Admin > Settings > User authentication.
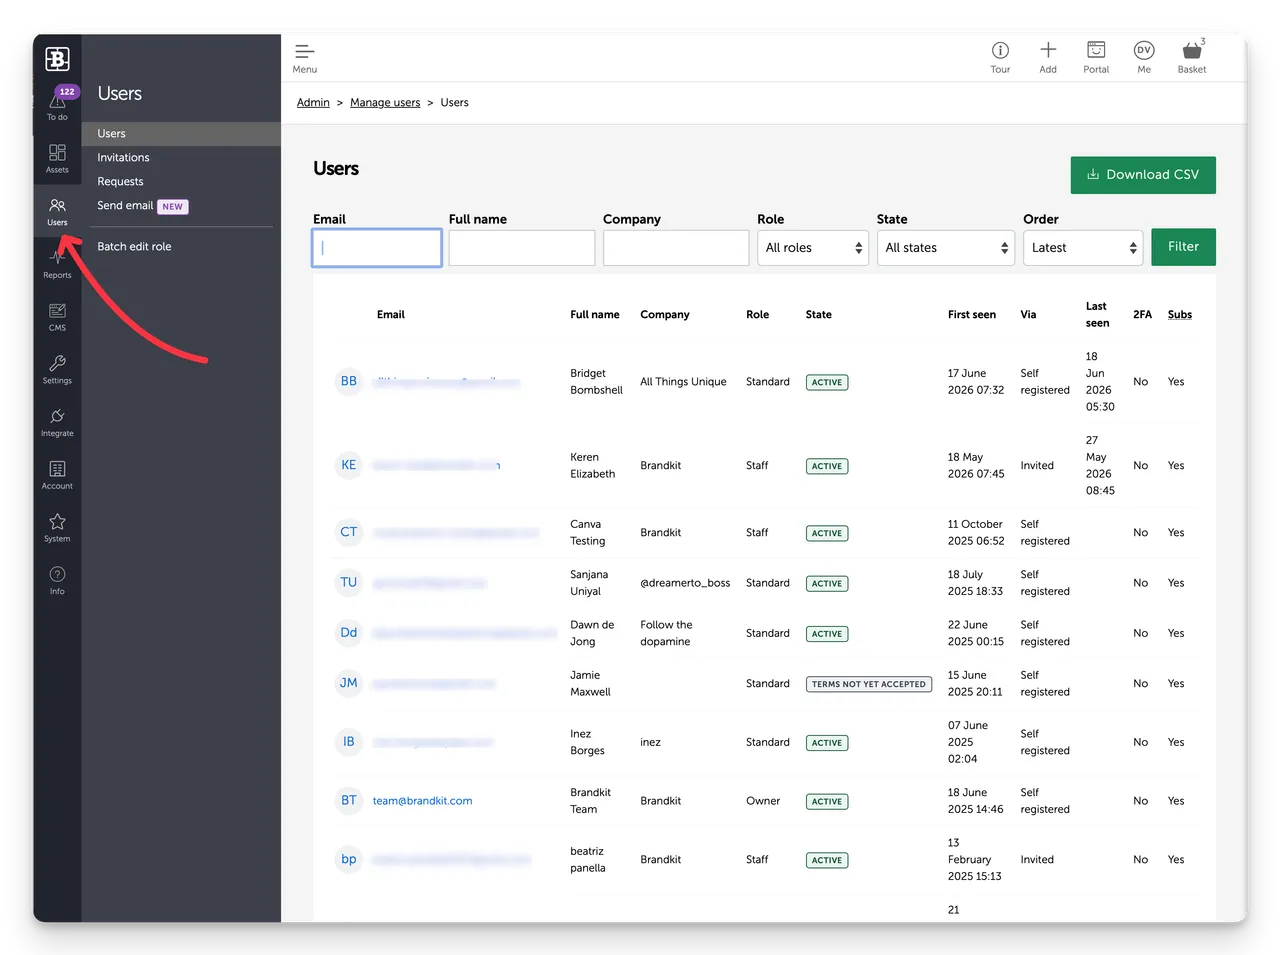
The Users page shows everyone who is registered to access to your Brandkit account. From here you can view, search, edit, and manage all registered users across your Brandkit account.
Navigate to Admin > Users > Users
Each row in the Users list shows:
Use the search bar and filters to find specific users by name, email, role, or status.
Note that Marketing Emails (e.g. New Content Alerts) are distinct from system transactional emails. (e.g. Share email)
Admins can edit any user (except user with the Owner Role), Owners can edit Admins and Owners.
Click anywhere in the User's row to open their profile.
From here you can:
Suspending a user prevents them from logging in without deleting their account or activity history. Useful when someone leaves the organisation temporarily or their access needs to be paused.
To reactivate, open the profile and click Reactivate account.
We don't support Delete users accounts because we want to retain the User History for auditing purposes.
You can Suspend instead. This block the User from login in again or registering with the same email address.
Invitations let you invite new users to your Brandkit account by sending them an email with a link to set up their account. Invited users are assigned a role before they join, so their access level is set from day one.
Navigate to Admin > Users > Invitations
The invitee receives an email with a link to create their account. The link expires after a set periodof time — if it expires, you can resend it from the Invitations list.
We currently do not support inviting multiple users at once. We have plans to add this feature in the future.
If you have a lot of Users we recommend allowing self-serve registration (Pro or Enterprise edition required) and just sending users to your Portal home page.
The Invitations list shows all invitations that have been sent but not yet accepted.
For each you can:
Once accepted, the user moves to the main Users list.
Requests is where you manage Download Requests from people who want to download but do not have Request permissions rather than Download permissions for certain Assets.
Navigate to Admin > Users > Requests
If you have User Roles configured with Request rights on some Vaults, those users cannot self-serve download Assets in those Vaults - but instead can Request.
These Requests are sent to Admins for review.
Admins review each Request and either Approve or Decline it. In Addition Admins can Approve individual Assets in the Request, When a Request is approved - Brandkit sends an Asset Transfer with the approved Assets.
When a Request is declined and email is sent to the requesting user, advising that the request was declined. Admins can add an optional message to that email.
To configure whether Requests are enabled and how the request form behaves, go to Admin > Settings > User Roles > Role.
Options include:
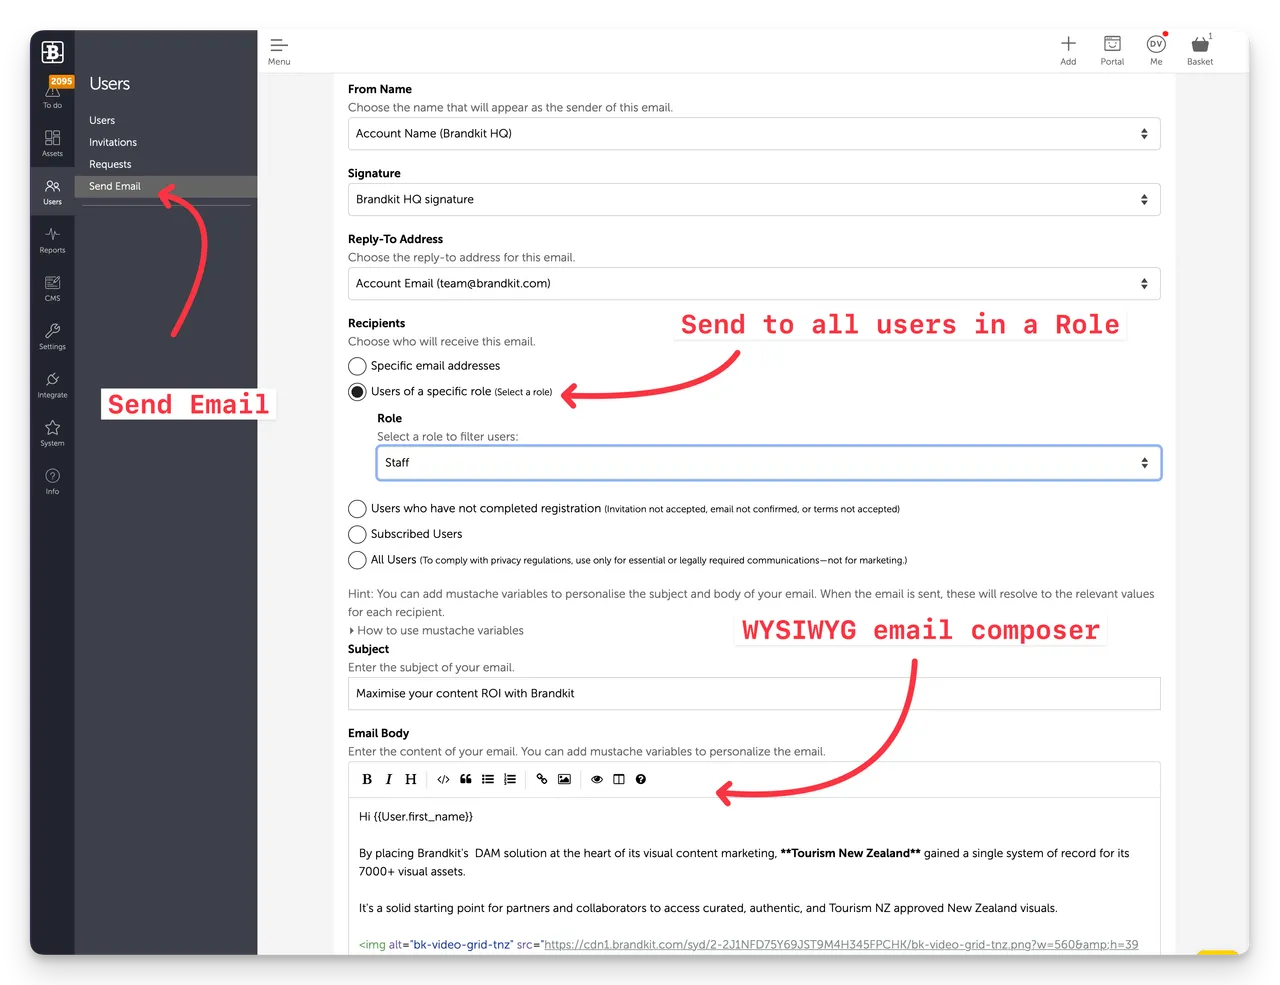
Send email lets you send a custom email message directly to email recipients and subscribed users on your account from within Brandkit — without needing an external email tool. Use it to communicate updates, announce new content, or send reminders to your team.
Navigate to: Admin > Users > Send email

The Send Email tool uses your account's custom HTML email template.
Navigate to Admin > Settings > Email to configure your HTML email template.
A confirmation shows how many users the email was sent to.
You can send emails to:
You can use Mustache Variables to personalise your emails.
You can do this by expanding the "How to use mustache variables" link and copying the mustache code block that is appropriate.
e.g. {{User.first_name}} - this inserts the recipients first name (if the recipent is a registered user (falls back to email address.
Example of how you would write this in your email body:
Hi {{User.firstname}}, Hope you are well ....
~
Brandkit Staff only
Batch edit role lets you update the role of multiple users at once — useful when onboarding a large group, restructuring access levels, or migrating users to a new role configuration.
Admin > Users > Batch edit role
All selected users are updated to the new role immediately.
To review and configure what each role can access, go to Admin > Settings > User roles.
The Reports section gives you visibility into how your Brandkit account is being used — content performance, user activity, downloads, searches, and more.
Navigate to: Admin > Reports
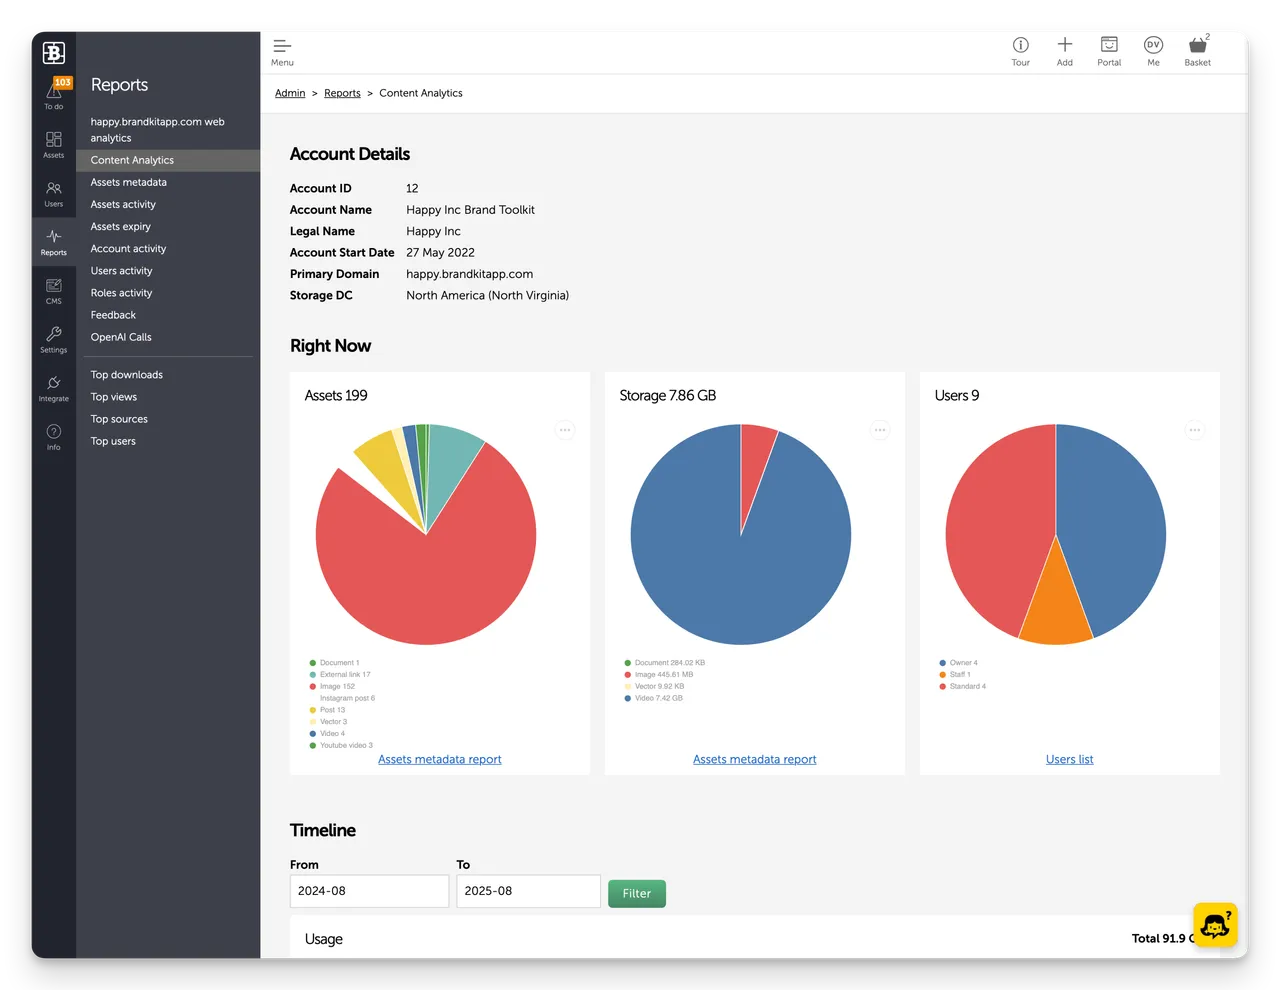
The default landing page is the Content Analytics dashboard.
The Content Analytics dashboard is the default page in Reports. It gives you a real-time snapshot of your account's content and usage.
Navigate to: Admin > Reports > Content analytics
Use the date range controls to zoom in on a specific period.
Three tabular reports covering asset metadata, activity, and expiry. All are searchable, filterable, sortable, and downloadable as CSV.
Navigate to: Admin > Reports
A tabular report showing metadata for all assets in your library.
Admin > Reports > Assets metadata
Use it to audit metadata completeness — identify assets missing titles, tags, licences, or other key fields. Filter and sort to focus on specific asset types or states. Download as CSV for offline review or import into another tool.
You can also download this report, edit it in a spreadsheet application and importa back the changes for mass updates ( Admin > Settings > Import Metadata)
A tabular report showing activity counts per asset — views, downloads, and shares.
Admin > Reports > Assets activity
Use it to identify your most and least engaged assets. Filter by date range to see activity for a specific period. Download as CSV.
A tabular report showing expiry dates and download counts per asset.
Admin > Reports > Assets expiry
Use it to identify assets approaching expiry or past their expiry date (are Expired). Filter and sort by expiry date to prioritise review. Download as CSV.
Three reports covering activity across your account — by event, by user, and by role.
Navigate to: Admin > Reports
A full audit trail of all activity in your account, displayed as a vertical timeline.
Admin > Reports > Account activity
Filterable by event type:
Click through individual events to view the related asset or user record where available.
Note: this is an on-screen report only — no CSV download.
A tabular report showing activity counts per user — uploads, downloads, shares, and more.
Admin > Reports > Users activity
Use it to understand which users are most active and identify inactive accounts. Filter by date range, search by user, and download as CSV.
A tabular report showing activity counts broken down by user role.
Admin > Reports > Roles activity
Use it to compare engagement across different user groups — for example, to see whether a particular role is downloading significantly more or less than expected. Download as CSV.
Two reports covering download activity and user feedback scores.
Navigate to: Admin > Reports
A tabular report of all download activity across your account.
Admin > Reports > Downloads
Each row shows a download transaction with a Download ID, date of download, the user (email) who downloaded it, Asset count, and any custom form data submitted.
Filter by date range and download as CSV.
Use it to audit download activity or investigate specific download events.
A tabular report of user feedback scores and comments collected after downloads.
Admin > Reports > Feedback
Each row shows the user, their feedback score, any comments left, and the date. Filter by date range and download as CSV.
To enable or configure the feedback survey shown to users after downloading, go to Admin > Settings > Feedback survey.
Feedback surveys are available as either 0-10 NPS or 0-5 CSAT options.
Plus you can add custom questions and set a survey interval. Navigate to: Admin > Settings > Feedback survey to configure.
Two reports covering AI token usage for accounts using Brandkit's AI features.
Navigate to: Admin > Reports
A combined tabular and visual report showing AI token usage over time.
Admin > Reports > OpenAI calls
Includes:
Filter by date range and download as CSV.
A report covering embedding calls specifically — used by the Semantic search feature to index your library of digital assets.
Admin > Reports > OpenAI embedding calls
Use it to monitor how many assets have been indexed and track embedding usage over time. Filter by date range and download as CSV.
Five leaderboard-style reports showing the most active assets, users, and sources on your account. All are filterable by date range and downloadable as CSV.
Navigate to: Admin > Reports
Assets ranked by number of downloads.
Admin > Reports > Top downloads
Use it to identify your most in-demand content and inform decisions about what to prioritise, update, or expand.
Assets ranked by number of views.
Admin > Reports > Top views
Views are recorded when a user opens an asset page. Use this report alongside Top downloads to see which assets attract attention but may not be getting downloaded.
CDN traffic ranked by the origin domain making requests.
Admin > Reports > Top sources
Shows where your content is being served — useful for understanding how and where assets are being embedded or shared externally.
Users ranked by an interactions score, calculated by summing activity across uploads, downloads, shares, and other events.
Admin > Reports > Top users
Use it to identify your most engaged users and recognise heavy contributors or power users.
Search terms ranked by frequency.
Admin > Reports > Top searches
Use it to understand what users are looking for. Frequently searched terms that return few results are a signal to add more content or improve tagging in that area.
Brandkit includes built-in privacy-friendly web analytics for your portal, powered by Plausible Analytics.
Navigate to: Admin > Reports > brandkit.com web analytics
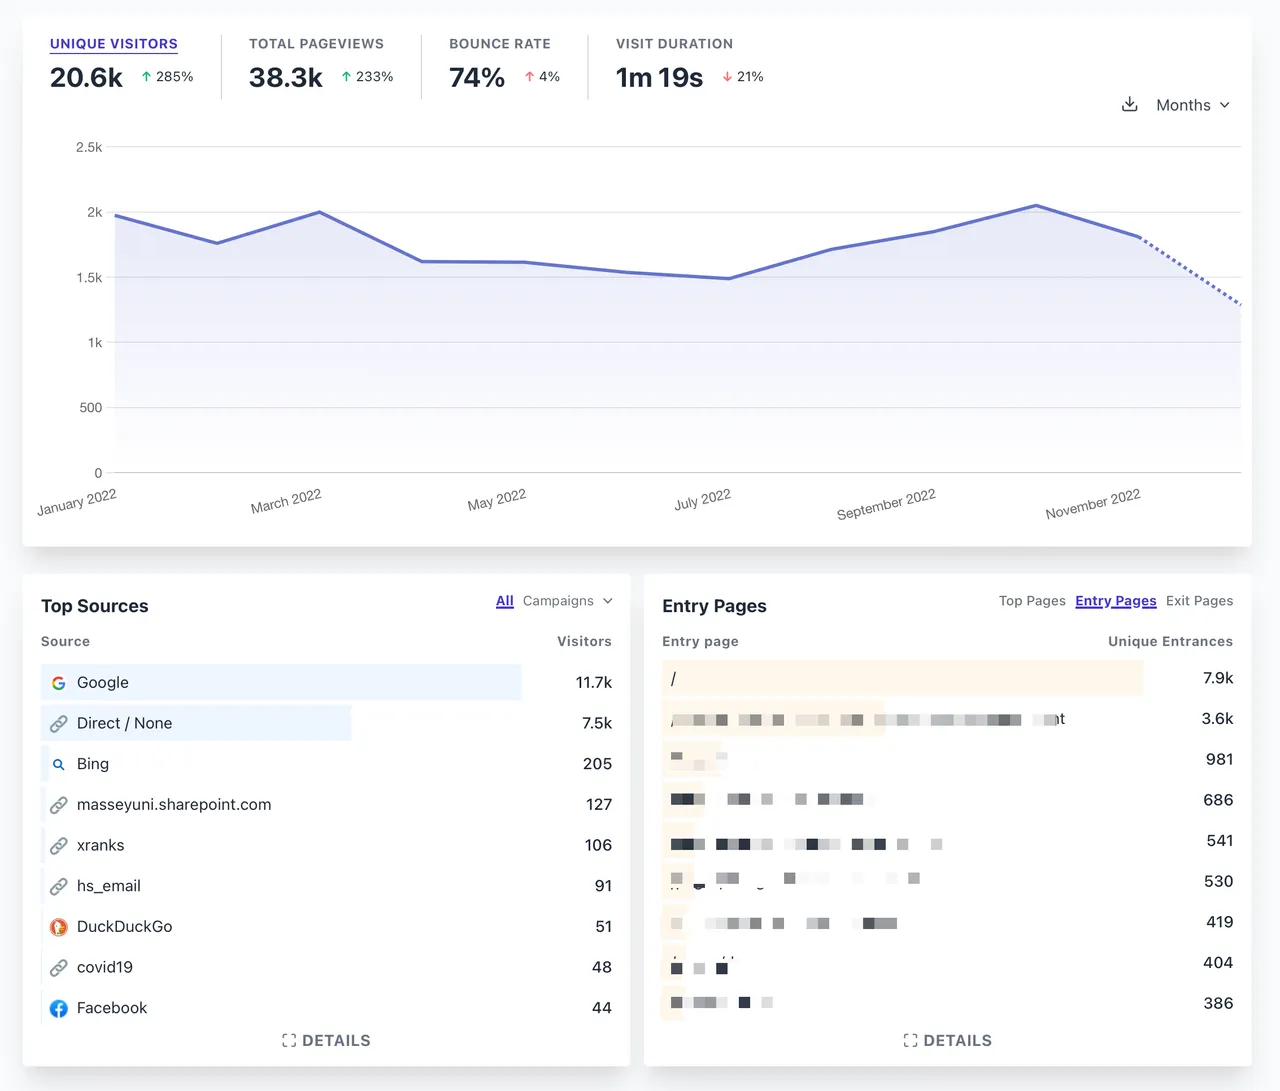
Standard web analytics for your portal including:
Note: CMS access is limited to customers on Pro and Enterprise Editions.
The CMS (Content Management System) is where you manage your brand portal — its design, layout, pages, and technical configuration. Everything your portal users see and experience is controlled from here.
Navigate to: Admin > CMS
OM6.1: Portal(s) | Configure your portal (or multiple Portals (paid add-on or Enterprise edition required), settings, layouts, and custom pages
OM6.2: Hosts - Set your portal's domain and URL
Your Portal is the public-facing website your users visit to find and download brand assets. The CMS controls everything about how it looks and works — from the domain it lives on, to the colours and fonts, to the layout of every page.
Unlike the Admin area (which is for Admins and Owners only), the Portal is what your users interact with. A well-configured portal makes assets easy to find and download, and presents your brand consistently.
Note: CMS access is limited to customers on Pro and Enterprise Editions.
The Portal area is where you set up and manage your brand portal — the site your users visit to access assets. From here you configure portal settings, layouts, and custom pages.
Navigate to Admin > CMS > Portal(s)
Portal settings
Configure your portal's core settings, including its name, theme, search page, and you can also add 3rd party scripts here.
Layouts
Manage the layout templates used across your portal pages. Each layout defines which sections appear on a page and in what order — navbar, body, announcements. main content, footer, and so on.
Custom pages
Add new pages to your portal. Each page uses a layout and is populated with content sections you configure. Pages can include asset grids, albums, text blocks, image galleries, FAQs, and more.
Each page is a stack of sections, that take either manually coded HTML or are smart sections that display Assets from the content
library.
Note: CMS access is limited to customers on Pro and Enterprise Editions only.
The Hosts area is where you set your portal's domain and URL. This controls the web address your users visit to access your brand portal.
Navigate to Admin > CMS > Hosts
Each Brandkit account has at least one host — the domain your portal lives on. By default and for all Team Edition plans this is a subdomain of brandkit.com (or alternatively brandkit.io or brandkitapp.com). for example acme.bradkit.com
For custmers on Pro or Enterprise Edition plans, a custom domain is an option. This is typically a subdomain of your company's website (e.g. brand.yourcompany.com) but can also be a completely standalone domain (e.g. 'launnie.com.au')
If you have multiple portals or need to support multiple domains, additional hosts can be added.
Hosts are added for you by Brandkit System Admins in tge system back end- but once added can be configured in your CMS > Hosts settings,
Adding a custom domain requires Brandkit staff to approve and configure it at the platform level first. Contact Brandkit support to get a custom domain set up before making changes here.
Navigate to Admin > CMS > Hosts
Once an approved domain has been added, you can select it as the default host for your account.
If your account has more than one host, you can select which one to use as the default. The default host is used in places like user invitation emails.
To set the default host, go to Admin > Settings > Genera > Default Host.
Note: CMS access is limited to customers on Pro and Enterprise Editions.
Themes control the look and feel of your portal — fonts, colours, spacing, and layout styling. Themes are applied using custom CSS.
Navigate to Admin > CMS > Themes
Brandkit portals use a CSS-based theming system. Your account starts with a the default theme which you can then customise to match your brand.
Changes to your theme take effect immediately across the entire portal.
Using CSS Themes, you can control:
Note: CMS accessible to customer ion Pro and Enterprise Editions.
Redirections let you set up 301 (permanent) and 302 (temporary) redirects on your portal. Use them when moving pages or restructuring your URL scheme.
Navigate to Admin > CMS > Redirections
Note: CMS access is limited to customers on Pro and Enterprise Editions.
Static files are images, icons, fonts, and other files used in your portal's custom pages and layouts — files that aren't assets in your brand library, but are part of the portal's visual design.
Navigate to Admin > CMS > Static files
Static files are design elements that support your portal's appearance. Examples include:
Unlike library assets (which users browse and download), static files are used behind the scenes to build your portal's UI.
Note that you can use library assets for portal site assets as well - but sometimes you don't want your site assets to be downloable/shareable by users. In this case use Static Files.
Once uploaded, the file is available to reference in your portal layouts and pages.
Static files are typically referenced by URL in CMS layout and page configuration, or directly in your theme CSS. The URL for each uploaded file is shown in the Static files list.
Note: CMS access is limited to customers on Pro and Enterprise Editions.
Content Security Policy (CSP) controls which external resources your portal is allowed to load — scripts, styles, images, fonts, and other content. It's a security feature that helps protect your portal and its users from malicious content.
Navigate to Admin > CMS > Content security policy
CSP defines a set of rules that tell browsers which sources of content are trusted. If a resource tries to load from a source not on the allowlist, the browser blocks it.
For example, if your portal uses Google Fonts, your CSP needs to include fonts.googleapis.com as a trusted source — otherwise browsers will block the fonts from loading.
You'll need to update your CSP when:
Note that this is an advanced setting suitable for web developers and folks that understand the technicalities of CSP. Please contact Brandkit Support if you are unsure.
The Settings section is where Owners and Admins configure how the Brandkit account behaves — from company details and branding defaults, through to security, permissions, and integrations.
Settings is organised into the following areas:
Navigate to any of these via Admin › Settings › [item name].
Navigate to Admin › Settings › General
The General settings page holds core account details and default branding shown across your Brandkit portal.
B Authentic, Why Brandkit?, Read our blog, Frequently asked questions, Customer stories, Customer case studies, Common use cases, Our origin story, Our manifesto, Why DAM, Why NOT DAM, DAM Learning Centre, Is DAM the worlds most boring software?, What is a Brand Portal, What is a Brand Kit?, How to create a Brand Kit (a step by stepo guide), What is a Branding System?, The good brand checklist, Don't do junk content, Visit our Help Centre, Search Brandkit resources and digital assets, See our Brand Guidelines, Contact us.
GET STARTED TODAY
Trusted by brands since 1994 - Free trial available.